
Learn how to make DIY (do it yourself) garden stepping stones the easy way. Find out about the different types of DIY garden stepping stone molds, the materials you need, and get step-by-step instructions to make easy DIY garden stepping stones. Discover ideas for decorating the stones plus some tips about laying the stones if you want to make a walkway. These garden stepping stones make the perfect gift for Mother’s Day, Father’s Day, Teacher Appreciation, and any other special day. They are also a great way to remember milestones, such as the first day of school, or commemorate an achievement, such as graduation. How do you make homemade stepping stones? Read on to learn how to make stepping stones!
Table of Contents
My DIY Garden Stepping Stones Backstory
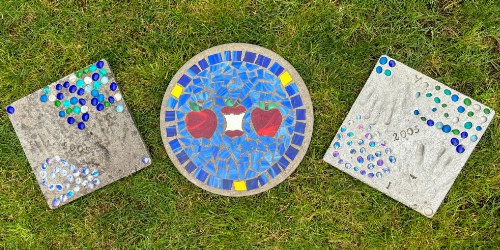
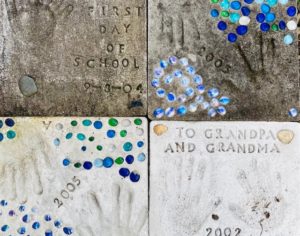
Years ago, I wanted to do something special to commemorate the first day of school for each of our boys. It’s interesting to compare the two DIY concrete stepping stones side-by-side. I obviously refined my technique, as you will see further on down. We liked creating the stepping stones for garden use so much that we made some for both sets of grandparents as holiday gifts. The boys had fun embellishing the stepping stones with their own personal touches. If you are looking for an easy and fun DIY gift idea, these garden stepping stones are a simple way to show someone you care. Best of all, they will last for years. Gather some inexpensive supplies and start creating!
This post contains affiliate links, which means I may earn a small commission from qualifying purchases at no additional cost to you. Please read my Policies page for more information.
How do You Make Cheap Stepping Stones?
Making cheap stepping stones for your garden is possible with a few simple and affordable materials. As you will see in the materials list below, DIY garden stepping stones can be inexpensive to make when you know which supplies to use. The good news is, most of the supplies for this stepping stones DIY project can be used over and over. Hooray for cheap garden stepping stones!
Materials Needed for DIY Concrete Garden Stepping Stones
Some type of a mold (read on for the list of possibilities)
Water
Petroleum jelly, vegetable oil, or cooking spray (to release the dried stone from the form)
Letter stamps (optional)
Embellishments (optional)
Concrete sealer (optional, but recommended if you are going to have the stones out in the weather)
Types of DIY Stepping Stone Molds
What can I use as a homemade stepping stone mold? There are many materials that lend themselves well to making DIY garden stepping stones for an easy stepping stone DIY project. Many of them you can probably find around your home. You might be surprised at the variety of materials you can use.
Round DIY Homemade Garden Stepping Stone Molds
Round garden stepping stones lend themselves well to creating a mosaic design from a broken plate. There are many different options for round stepping stone molds. Here are some of the most common molds from simple household items for making garden path stones:
Old cake pans, pie tins, or springform pans: If you decide to use one of these for a mold, you can reuse it as many times as needed. Just smear some petroleum jelly or vegetable oil around the inside to prevent the concrete from sticking to the pan.
Buckets: Plastic 5-gallon buckets work well, as do old ice cream buckets or spackling buckets. Choose the size you want and you’re all set.
Garden saucers: The plastic saucers used for drainage under garden containers come in a variety of sizes. This is a terrific, inexpensive stepping stone mold because the flexible plastic ensures easy unmolding after the concrete is dry.
Square DIY Homemade Garden Stepping Stone Molds
If square garden stepping stones are what you’re looking for, it’s easy to find some possibilities for molds. Just take a look in your kitchen. It’s a treasure trove of DIY garden stepping stone mold ideas for your DIY garden stone project!
Pizza boxes: The boxes from small or mini-sized pizzas lend themselves well to becoming molds for DIY garden stepping stones. Lining the boxes with plastic prevents the cardboard from becoming soggy. If you are making the stepping stones with a large group, like a school class of kids, pizza boxes are an economical way to make a lot of stepping stones at one time.
Square cake pans: As with the round pans listed above, a little bit of petroleum jelly will help the concrete to release from the pan when it’s dry.
Homemade concrete forms with scrap lumber: If you have some scrap pieces of 2 by 4 lumber, and some scrap plywood to use as a base, a simple form can be constructed. This type of form is especially useful if you would like to make thicker concrete stepping stones.
Milk jug: For a square stepping stone with rounded corners, cut the top off of an old milk jug. The plastic jug bottom is perfect for containing the concrete as it dries.
Other Form Shapes for DIY Garden Stepping Stones
Here are some ideas for DIY stepping stones molds you might not have thought of:
Large leaves: Spread some concrete on top of a large leaf for a leaf-shaped stepping stone. Some good leaves to use include rhubarb (I have those!), hosta, or acanthus.
Oddly-shaped cake pans: Cake pans come in all shapes and sizes. Not sure what to do with that hexagonal cake pan you inherited from Great Aunt Mabel? Turn it into a stepping stone mold! The good news is, you can still use the pan for baking cake later on. (After cleanup, of course.)
Purchased Plastic Garden Stepping Stone Molds
If you don’t have anything at home you want to use as a stepping stone mold, you can get inexpensive, pre-made plastic molds. The basic round and square molds are very reasonably priced. They are flexible enough to unmold the dried concrete easily and durable enough to be used over and over.

What is the Best Material for DIY Garden Stepping Stones?
The best material for DIY stepping stones depends on several factors, such as the look you want to achieve, the climate in your area, and the amount of foot traffic the outdoor stepping stones on your garden path will receive. Here are some of the most popular materials for DIY garden stepping stones:
Concrete: Concrete is a versatile and durable material for DIY stepping stones. It’s easy to work with and can be mixed with a variety of decorative items like glass beads or stones for a unique look. Concrete stepping stones can be painted or stained to match your garden’s style.
Wood slices: If you have access to a large tree trunk, you can slice it into rounds to create unique and natural-looking stepping stones. If you have a wood-burning kit, you can etch names and dates onto the wood for a lasting keepsake.
Plaster of Paris: Some people prefer to use plaster of Paris with kids because plaster of Paris is non-toxic. Buy a package of plaster of Paris material and follow the instructions. Just as with concrete stepping stones, plaster of Paris stepping stones may be personalized to match your garden decor or to create a special keepsake.
Which Concrete Should I Use for a Stepping Stone?
Although special stepping stone concrete mix may be purchased, if you plan on making multiple stepping stones, the sand-based concrete mix at your local hardware store is a much better buy. For about half the price of the stepping stone concrete mix, you can get a bag that is about 10 times the size. It is definitely cheaper to buy a bag of Quickrete mix.
How Can I Put Words on a DIY Garden Stepping Stone?
When I first started making stepping stones, I tried to write in the concrete with a wooden popsicle stick. It didn’t turn out very well. I was so disappointed! Later, I discovered letter and number concrete stamps. What a game-changer! These are double-sided, with a raised letter or number on each side. That way, when you are pressing the stamp into the concrete, you have something to grab onto to lift the stamp after pressing it down.

I have used these stamps multiple times, and they make the stepping stones look so much nicer. They clean up easily and don’t take up too much space in my craft cupboard.

What Kind of Embellishments Can You Add to Stepping Stones?
Part of the fun of making DIY garden stepping stones is that you can decorate them. Small, round glass stones make colorful additions. Seashells, if they are embedded deeply enough (so they don’t break when the stone is stepped on) also make great decorations. As mentioned above, a mosaic may be made from pieces of broken dishes. Just be sure to embed the pieces deeply enough so that none of the sharp edges are sticking up higher than the surface of the stepping stone.
Directions for Making a DIY Garden Stepping Stone
Here’s how to make a stepping stone from start to finish:
Step 1. Prepare your mold by coating it with petroleum jelly, vegetable oil, or cooking spray. You can also line the inside of the mold with plastic wrap if you wish. Sometimes there are wrinkles though, so plastic wrap is not my first choice.
Step 2. Add water to your mix slowly until it is about the consistency of oatmeal. The amount of mix you use will depend upon the size of the mold you are using.
Step 3. Pour the mixture into the mold. If you want to make your stepping stone extra-sturdy and protect it from cracking, lay in a piece of chicken wire cut to size when you have poured about half of the mixture in. Continue pouring the rest of the mixture to cover. The amount of mixture should be about 2 inches thick. If you have a homemade mold built from scrap lumber, you may have enough room in your mold to make it thicker.
Step 4. Smooth with a plastic putty knife or another smoothing tool. Allow the mixture to set and thicken for about an hour. At that time, you may add decorative embellishments, if you wish. (See the section below about Mosaic Stepping Stones.)
Step 5. Allow the stone to remain in the mold overnight.
Step 6. Unmold and allow to cure for 1-3 weeks.
Step 7. (Optional) How do you protect a stepping stone from the weather? For extra weatherproofing, add a coat of clear polyurethane, waterproof acrylic sealer, or concrete sealer.
How do you Make Plaster of Paris Stepping Stones?
Using plaster of Paris for stepping stones is a simple and fun DIY project that can be completed in just a few hours. Here are the materials you need, along with the simple instructions. The steps are very similar to the directions for making DIY garden stepping stones with concrete.
Materials Needed for DIY Plaster of Paris Garden Stepping Stones
Water
Large plastic container or bucket
Non-stick cooking spray or petroleum jelly
Decorative items (optional)
Instructions for Making DIY Plaster of Paris Garden Stepping Stones
Choose a mold for your stepping stone. You can use plastic or metal cake pans, pie plates, or any other container with a shape and size you like.
Coat the inside of the mold with a thin layer of non-stick cooking spray or petroleum jelly. This will help the stepping stone release from the mold once it’s set.
Mix the plaster of Paris according to the package directions. Add water to the mix gradually and stir until it reaches a thick, smooth consistency.
Pour the plaster of Paris mix into the mold, filling it about halfway. Tap the mold gently on a hard surface to remove any air bubbles.
If you want to add decorative items, place them on top of the plaster of Paris while it’s still wet. You can use glass beads, pebbles, shells, or any other small objects you like.
Fill the rest of the mold with plaster of Paris until it’s level with the top.
Smooth out the surface of the plaster of Paris with a trowel or spatula.
Allow the plaster of Paris to dry and cure according to the package instructions. This usually takes several hours.
Once the plaster of Paris is fully cured, remove the stepping stone from the mold by gently tapping it on a hard surface or by carefully cutting away the sides of the mold.
Allow the stepping stone to dry completely before painting or decorating as desired.
Plaster of Paris stepping stones can be used to create a unique garden path or as decorative accents in your garden. They are lightweight and easy to make, making them a great DIY project for beginners.
Mosaic Garden Stepping Stones
Whether you make your garden stepping stone out of concrete or plaster of Paris, you can add decorative embellishments after pouring the mixture into the mold. One decorative idea is to make a mosaic. Here is an example of a stepping stone that was given to my mom, a teacher.
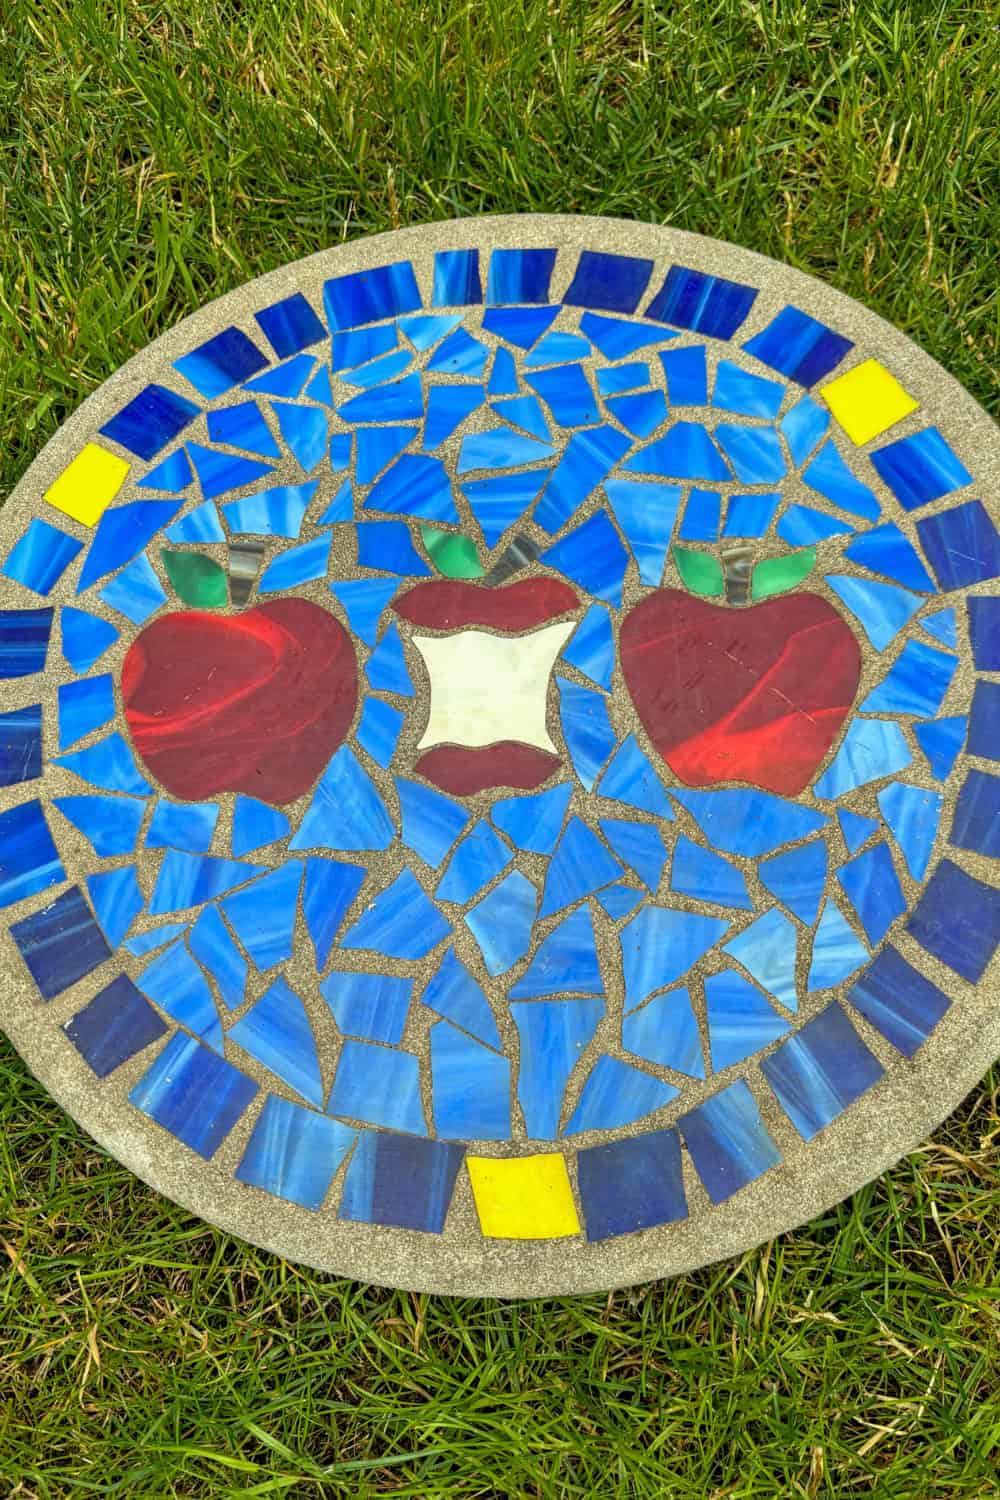
To make a mosaic stone similar to this one, you can purchase packages of glass squares or randomly-shaped pieces and create your design. If you want to put in specific shapes, like the apples pictured above, but have no glass-cutting skills, consider embedding a glass suncatcher.
Handprint and Other DIY Garden Stepping Stone Ideas
How do you make a stepping stone footprint? Or a stepping stone handprint? We have done handprints and pawprints. To make footprints, handprints, or pawprints, just wait until the concrete mixture has set for an hour. If you do the prints too soon, they might disappear in the wetness. Gently press each foot, hand, or paw into the mixture, going straight up and down. Be sure to wash the body part thoroughly afterward, as the concrete might cause skin irritation if not washed off. That’s it! Then just follow the directions above to finish off the DIY garden stepping stone.
Installing Your DIY Stepping Stones in the Garden

Can I use stepping stones as pavers in the yard? Depending on the thickness of your stepping stones and the sentimental value, you may or may not choose to use them as pavers. Once they are cured and sealed, they should be able to withstand walking. If you choose to make a path, what do you put under stepping stones? Here’s how to lay a stepping stone path.
Step 1. Lay out the stepping stones and position them where you want them. Can you just lay stepping stones on top of the grass and leave them there? Not if you want to have a hassle-free lawn-mowing experience.
Step 2. When you have the stepping stones in position, use a half-moon edger to edge around the stones. Set each stone aside after tracing its outline and dig out the soil so that there is a hole the same depth as the stone plus about 1 and 1/2 inches. You can use a line of string to measure and check the depth. Can you lay stepping stones on soil? Yes, but you will want to go through the same digging-out process to bury the stones to ground level. This provides protection for the stones and prevents the stones from becoming tripping hazards.
Step 3. Pour in some sand or stone dust for setting the stepping stones. Use a leveling tool to position the stones. Do you need leveling sand for stepping stones? If you want a stable stepping stone path, using sand or stone dust is a good idea. How do you keep stepping stones from sinking? Using sand or stone dust can help with this, too.
Step 4. Use a rubber mallet to gently pound the stones and make sure they are stable.
How Thick Should the Stepping Stones Be?
You want to make your stepping stones thick enough so they don’t crack if you plan to use them as pavers on a stone path. If you make them too thick, you will have to dig out quite a bit of dirt when placing them. In the picture below, the stepping stone on the left is only a little over an inch thick. It’s more useful for decorative stepping stones rather than actual use. The stepping stone on the right is extremely thick, about 4 inches. It is probably sturdy enough for an elephant to stand on, but it would take a long time to dig the holes for placing in a pathway. A good depth (thickness) for a stepping stone is about two inches.

Are You Now Inspired to Make Some DIY Garden Stepping Stones?
If you decide to create your own stepping stones, I’d enjoy seeing photos of your DIY garden stone creations. Just tag me on Instagram and I’ll feature you in my story. It will be fun to see what you design!
Free Online Garden Planner Layout Template
Now that you know how to make your own stepping stones, you might need a way to plan your garden layout. Whether you are planting vegetables, flowers, or herbs near your rosemary plant, this online garden planner can help you visualize your design and bring it to life. With garden tasks that need your attention, this is one way to save time.

It’s fully customizable when you make your own copy and includes two editable chart pages for noting planting specifications.
Get my free online garden layout planner template!
Organize Your Garden Tasks with a Free Garden Planner Notebook
As a result of needing to keep track of garden tasks throughout the year, I decided to begin a garden planner notebook. It has a page for each month, along with notes pages. If a garden planner notebook seems like a good idea to you, good news! You can get it here!

Get the garden notebook!
Other DIY Garden Posts You Might Enjoy
If you are artistically challenged like I am, here’s how to plant flower containers with confidence. Looking for an easy way to add some vertical interest to your vegetable garden? Check out this post about making an easy DIY pole bean tower. If you’re a fan of dahlias and want to learn how to fearlessly divide dahlia tubers, I’ve got you covered. If the weather is too crummy to go outdoors, create some garden-inspired art with this easy pointillism project. Thanks for stopping by to read about DIY garden stepping stones. May you have success with all your gardening endeavors! Have a wonderful week, and may all of your rosemary-growing endeavors meet with success!

Lisa Mitchell is a wife, mom, and school librarian who likes to grow fruit, herbs, vegetables, and flowers on her family’s small Pacific Northwest farm. To learn more about what this website has to offer gardeners, click on over to the Garden page.
Want more great garden, food, or travel ideas? Follow FluxingWell on Pinterest, Facebook, Instagram, and X for the latest posts, tips, and inspiration.
Thanks for such great DIY stepping stones ideas! Perfect for gifts!
I appreciate the kind words. My family has had fun designing and gifting garden stepping stones.
I would never have imagined that it was this easy to make DIY garden stepping stones, but as things have turned out, it is easy. It’s much easier than I ever imagine it to be, at least.
I am so glad you had a good experience making DIY garden stepping stones. They are a fun, lasting keepsake.
I heavily coated the mold with oil. Will it ruin the concrete setting?
I don’t think so. The oil should help the stone slide out of the mold, though. I’d be interested to know what happens to your stepping stone.
This really looks like fun! Definitely going to try! Thank you!
I’m so glad you’re going to try these DIY garden stepping stones. Have fun!
This is definitely a good project for small children to do with their grandparents.
Yes! My parents had a couple of stepping stones from my boys and they treasured them.
This would be a fun project. I have so many ideas for making diy garden stepping stones. Let’s get busy and have some fun!
I agree! I’d enjoy seeing your completed garden stepping stones when you finish.
I’ve been collecting decorative materials to make garden stepping stones for a while. Now I feel prepared to get started. I appreciate all the added info such as recommending thickness and chicken wire. Many thanks!
You are most welcome! I was nervous about making them at first, and they were easier than I thought they would be.
I love the idea of making gardening stepping stones. They look pretty easy to make and I love how they can be made in so many different ways and make them truly unique. I have plans to hopefully expand our garden area this year and adding in some DIY stepping stones would be a nice touch.
Oh, I hope you get to make some garden stepping stones. If you do, I’d love to see pictures!
These garden stepping stones are a great idea. I need to make a few for my garden.
I hope you get to make some garden stepping stones. It’s a fun project.
This is a great post, thank you! I’ve never thought about making garden stepping stones myself, but you’ve laid out all the steps in such a clear way that it seems achievable to do. My kids grandparents would love the hand mould idea. I also appreciate how you show your photo comparison of when you did things wrong vs right, very helpful to see. Love your garden stepping stones!
Thank you so much for the positive affirmation. I wasn’t sure about showing the ones that haven’t weathered well, but that’s reality, right? I hope you get to try making some garden stepping stones!