Learn how to create colorful, easy pointillism art work with some simple pointillism projects. These easy pointillism art lesson plans are perfect for creating beginner pointillism art. Not confident in your artistic skills? No problem! Get the tips and steps you need to complete a beautiful masterpiece of your own or teach a pointillism art lesson to students. Pointillism is a simple technique to learn, and can be adapted to any age or skill level. Read on to learn how easy a pointillism project can be and get some simple, easy pointillism art project ideas of your own.
Table of Contents
My Pointillism Backstory
Whenever I see blossoming cherry or plum trees, I think of my favorite art project. I first began doing pointillism art projects with kids about 25 years ago when my school district became invested in Discipline-Based Art Instruction as part of the curriculum. Our lovely school librarian purchased a collection of large art prints, and included among them were these examples of pointillism: George Seurat’s “The Circus” as well as “A Sunday on La Grande Jatte”. I thought it would be fun to try to have the students create pointillism projects using the blossoming plum trees at the school as inspiration.
As some of you know, I am rather artistically challenged. That’s why these easy pointillism painting activities are so terrific. Whether you are doing a pointillism art project with preschool students, a pointillism lesson plan with middle school students, or a pointillism painting as part of an adult art class, learning the pointillism technique is easy and requires only a few simple supplies. People always admired the results when I displayed student pointillism art on the bulletin board. It’s a snap to be successful with these pointillism projects!
This post contains affiliate links, which means I may earn a small commission from qualifying purchases at no additional cost to you. Please read my Policies page for more information.
What is the Technique of Pointillism?
A Basic Pointillism Art Definition
Pointillism is a technique of painting that involves creating an image using small, distinct dots of color. The idea behind pointillism is that the human eye will blend the colors together optically, creating a more vivid and luminous image than traditional blending techniques.
To create a pointillist painting, an artist applies small dots or strokes of pure color to the canvas, rather than blending colors on the palette or the canvas itself. The dots are usually placed close together so that they can be blended by the eye. When viewed from a distance, the colors blend together to create the desired image.
Who is Famous for Pointillism?
The technique was developed in the late 19th century by Georges Seurat and Paul Signac, and was part of the larger artistic movement known as Neo-Impressionism. Today, pointillism remains a popular and influential technique among artists. Whenever I teach a pointillism art lesson, I try to have an art print of Seurat’s for students to observe.
What is an Example of Pointillism?
As previously noted, one famous example of pointillism is Georges Seurat’s “Un dimanche après-midi à l’Île de la Grande Jatte” (“A Sunday Afternoon on the Island of La Grande Jatte”). This large-scale painting, completed in 1886, depicts a scene of people enjoying a sunny day in a park on the banks of the Seine River in Paris. Seurat used the pointillism technique to create the image, applying small dots of pure color to the canvas. When viewed from a distance, the colors blend together optically to create a vivid and luminous scene. The painting is now housed in the Art Institute of Chicago and is considered one of the most iconic examples of pointillism. Other notable examples of pointillism include Paul Signac’s “The Port of Saint-Tropez” and Maximilien Luce’s “The Seine at Asnières”.
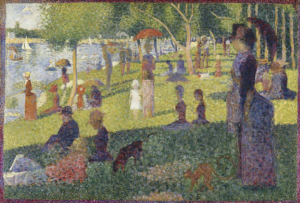
When introducing students to pointillism, I have them observe the art print from a distance at the back of the classroom, then observe the print from about one foot away. They are always astonished at the difference. Other examples of pointillism I like to have students observe are (as previously noted) “The Circus” by Georges Seurat and also his painting titled “The Seine from La Grande Jatte“.
How is Pointillism Done?
Pointillism does not have to be difficult. I have gotten the best result with students when allowing the lesson to be completed in short sessions for separate colors, allowing for drying time in between applications. Here are the basic steps involved in creating a pointillist painting:
Start with a rough sketch of the image you want to create on the canvas.
Choose a color palette of pure, unmixed colors. Pointillism relies on the optical blending of colors, so it’s important to use pure colors rather than mixed ones.
Begin applying small dots or strokes of color to the canvas using a fine-tipped brush, cotton swabs, or other painting tool such as the eraser end of a new pencil. The dots should be placed close together, but not so close that they blend together completely.
Continue to build up the image using a variety of colors and dot sizes, paying attention to the light and shadows in the scene. Allow for drying time of one color before applying another color so that the dots remain distinct.
Stand back from the canvas frequently to check the overall effect of the painting. Because pointillism relies on optical blending, it’s important to step back and view the painting from a distance to ensure that the colors are blending together in the desired way.
Work slowly and patiently, taking care to apply each dot with precision. Pointillism is a time-consuming technique, but the results can be stunning.
By using this technique, artists are able to create vibrant, luminous images that capture the light and color of the natural world.
How do You do Pointillism for Kids?
Pointillism can be a fun and engaging painting technique for kids, as it allows them to create colorful and vibrant images using simple, easy-to-manage dots of paint. Here are some tips for doing pointillism with kids:
Start with a simple image or shape. To introduce kids to the technique, start with a simple image or shape, such as a flower, a tree, or a circle. This will help them get a feel for the technique before moving on to more complex images.
Choose a color palette. Pointillism relies on the use of pure, unmixed colors, so choose a palette of bright, vibrant colors that will blend well when applied in small dots.
Kids may find it easier to apply the dots using the eraser end of a new pencil, which provides a larger surface area than a fine-tipped brush. You can also use cotton swabs or Q-tips, but I have found that the cotton on the ends starts to unravel and become fuzzy after a bit of use, making the dots less distinct. Using the eraser end of a new pencil keeps the dots crisp and clearly defined. This can make it easier to create the desired effect without getting frustrated.
Encourage experimentation. Pointillism is a technique that allows for a great deal of experimentation, so encourage kids to try out different color combinations, dot sizes, and spacing to see what effects they can create.
Take breaks. Because pointillism can be a time-consuming technique, it’s a good idea to take breaks and step back from the canvas periodically to avoid getting fatigued or frustrated. This can also help kids to see the overall effect of their work and make adjustments as needed. Another benefit is that the dots of one color are given some drying time before the next color is applied, keeping the colors from blending too much.
Have fun! Pointillism is a fun and engaging technique that can be a great way to introduce kids to the joys of painting. Encourage them to experiment, play, and have fun with the process, and celebrate the colorful and vibrant images they create.
Pointillism Lesson Plan for a Springtime Primary Grades Project
Supplies:
Examples of pointillism art for students to observe
White drawing paper cut into 6 inch squares (or light blue for very young children, to eliminate having to paint the sky)
Sharpened pencils for sketching
Unsharpened pencils with brand new erasers for making the dots of paint
Tempera paint in red, blue, green, brown and white (or you could have students mix yellow and blue to make different shades of green)
Brown marker (if you don’t have brown paint)
Paper plates to use as palettes
Paper towels for blotting
I usually have a discussion with students about lines. If the weather is nice, I like to take the students outside to observe the straight and curved lines in nature, specifically a blossoming tree, if there is one nearby. Then we go inside, and I have the students create a simple line drawing along with me.
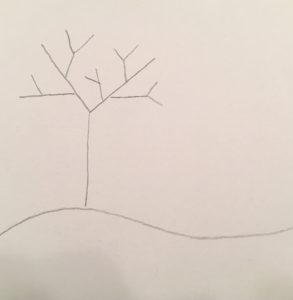
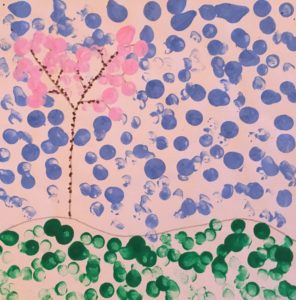
I have the students draw a series of straight lines in the shape of the letter Y for the tree trunk and branches. Then I have the students draw a curved line for the ground. If students wish, a sun may be sketched in, or clouds, but nothing too complex. After creating a simple sketch, each student uses the brand new eraser end of an unsharpened pencil to dip into tempera paint.
Painting Pointillism with Patience
Each student should have squirts of paint in desired colors, with enough room on the plate for mixing colors, if desired. I always demonstrate how to load the paint on the eraser, blot on a paper towel if needed, then press straight down with the eraser onto the paper until more paint is needed. I have students put dots on the tree trunk and branches first, with either a marker or paint. Then I have students add dots to the sky and the ground. Later, after a short break, students may add the pointillism blossom dots to the tree.
When I display the student artwork, I like to place the art print by George Seurat nearby. Students seem to enjoy having their work displayed alongside that of a famous artist.
Pointillism Lesson Plan for a Back to School Primary Grades Project
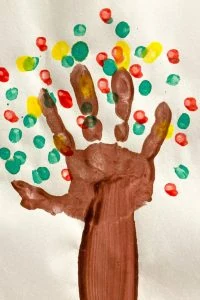
Create some fun apple tree handprint pointillism art with this easy pointillism project for younger elementary or preschool students. The supplies and directions are simple. The time it will take to complete the project will vary according to the amount of drying time you allow in between each painting step. Here is what you will need:
9 by 12-inch sheets of white construction paper
Old pie tin or plate, larger than the hand of a child
Unsharpened pencils with brand new erasers for making the dots of paint
Tempera paint in brown, green, red and yellow
Paper plates to use as palettes
Paper towels for blotting
Examples of pointillism art for students to observe
Pointillism or apple books to read during drying times (optional)
Directions:
Pour brown tempera paint onto the pie tin or plate. Have students carefully press their hand into the brown paint, then press onto the white paper. Using the 2-inch wide paintbrush, have the student carefully paint a straight 2-inch wide line down connecting the bottom of the hand print to the bottom of the paper. Let the brown paint dry for at least an hour.
While the brown paint is drying, have students observe a pointillism art print from the back of the room, then from close up. Discuss the difference.
Put out paper plates and place squirts of green paint onto the plates. Distribute unsharpened pencils and demonstrate how to make the dots of green on the hand tree. Let students add the greed dots to the branches. Let dry for a bit while you read a book about George Seurat.
Return to artwork and distribute squirts of red paint. Have students repeat the steps to making pointillism dots of red for apples. Remind students to avoid loading too much paint on the ends of the erasers, and to use the paper towels for blotting, if needed.
While the red paint dries, read a book about apples.
Finally, return to artwork and distribute squirts of yellow paint. Have students add a few yellow apples to the tree. Let dry, then display the paintings alongside a pointillism art print.
Pointillism Lesson Plan for an Upper Elementary Project
The basic concept is the same for an upper elementary pointillism art lesson as the springtime primary pointillism art lesson, with the same supplies. Mainly, the difference is in the number of details in the sketch as well as the size of the painting. This example was created on nine inch by twelve inch paper. Older students may wish to add other landscape elements, such as a mountain.
Pointillism Lesson Plan for a More Advanced Project
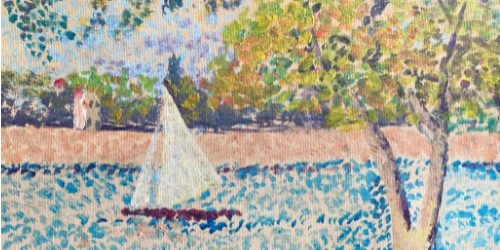
On a recent visit to see my parents, I noticed that my dad had created his own pointillism painting. He had taken an art class, and had used Georges Seurat artwork as his inspiration as well! Here’s my dad’s painting, which was based on the painting “The Seine from La Grande Jatte“:
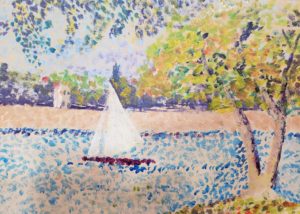
Although the supplies are different, the basic concept is the same.
Supplies:
One art print of “The Seine from La Grande Jatte“, poster-sized, if you can find it
One 1/2 inch flat brush
One little round brush with short bristles
One wider brush for painting a base coat of light color
One 12 inch by 18 inch canvas, pre-treated with sizing, available at most craft stores
Acrylic paint
As with the previously-described pointillism projects, begin by sketching a landscape or other design, then fill in with dots of paint. My dad’s best tip: To speed up the painting process, use a wide brush to paint a light base coat of color for each area of the painting. That way, the dots do not have to be painted so densely. Thanks for the tip, Dad!
Other Fun, Simple Art Projects
Inspired to create other artistic masterpieces? Here are some other project ideas you might like to try. Make a lasting, creative keepsake with this DIY garden stepping stone activity. Help even the smallest kids design an easy fish print t-shirt as a gift for someone special. Create a colorful origami greeting card with simple supplies, perfect for Mother’s Day, birthdays, or any other special occasion. Encourage budding gardeners with some seed saving activities. There are many possibilities for garden-related crafts.
Planning to Teach a Pointillism Art Lesson?
Do you think you might like to try pointillism? Perhaps teach a pointillism art lesson? Whatever your level of artistic expertise, a marvelous creation will result. That’s my kind of art project, and maybe it’s yours as well. It’s always nice to have a place to jot down ideas and schedules for projects. With this 16-page planner, all of your art lessons, appointments and lists can be in one well-organized place. Just download and print the file to get started.
Get the planner!
Have a wonderful week, and may all of your artistic pointillism endeavors meet with success!
Lisa Mitchell is a wife, mom, and teacher who gets inspiration for art projects from the beautiful outdoors surrounding her family’s small Pacific Northwest farm. To learn more about what this website has to offer, click on over to the Welcome page.
Like this post? Please give it a share! =)
Want more great food, garden, or party ideas? Follow FluxingWell on Pinterest, Flipboard, Facebook, Instagram, and X for the latest posts, tips, and inspiration.





Love this!
A great (and time consuming!) fun art project!
Will definitely be trying this with the kids this week! And for myself!
Great post! 🙂
Yes, it keeps kids busy for a while, that’s for sure! Have fun!
I love how artists just came up with pointillism. Maybe they were bored of just painting the good old way?
Thanks for bringing this to us, love this post!
Anthony,
I agree, pointillism is definitely a different way of looking at things. I’m glad, because I’d sure have a difficult time trying to paint the details as they really look. I hope you get to try this fun painting technique, and if you do, please feel free to share your work so we can see how it turned out! Thanks for your comment, and have a super week!
Lisa
This sure does seem like fun…if I ever have the guts to let me toddlers get near paint! LOL
Nicole,
Who knows? It might work out well! =) Thanks for your positive comment, even if you do choose to hold off trying it for a few years.
Lisa
Such a great post! I used to love my art-class segments on this painting technique 🙂
Flossie,
Thanks for the positive words. It seems as if you have had a lot of experience with teaching art. I’m glad you liked the post!
Lisa
I’m a terrible artist, always have been, but this looks like something that would be right up my daughter’s alley! I’m going to suggest we try it together! Thanks for the idea!
Sarah,
Oh, I hope you do get to try it together! If I can have success with it, that should be a big encouragement to everyone else to give it a try. Thanks for the positive words!
Lisa
I love this kind of art!
Eefje,
I’m glad you enjoy this type of art. I’ve always had a great time with it. It’s fun to see the astonishment of the kids when they see what they have created. Thanks for commenting!
Lisa
I just visited an art museum, and I was blown away by the various paintings. I wish I could paint too, but I am also artistically challenged. Pointillism seems to be a fun and easy art project to do, and this is something I’d like to try. By the way, I love your dad’s painting!
Life Travel Soul,
I agree, it is amazing what people can create. I hope you do get to try pointillism, and I appreciate your kind words about my dad’s painting. I love it, too!
Lisa
I remember these types of art projects from when I was in school, although we used ink pens. At first, I thought, as an amputee, I could never do this but then I had a great idea. I use a stylus for everything. Why couldn’t I use my stylus to paint like this too? Thank you, Lisa, for a great way for me to create art. I’m looking forward to trying it!
Wendy,
I actually thought of you when I was writing this. I’d love to see what you create. Thanks for your positive comments, and have fun trying out the pointillism technique.
Lisa
This seems like a great art project. You make it look so easy thank you so much for sharing I can’t wait to try it
Holly,
It is easy, and fun as well. I hope you get to try it out. Thanks for your positive words!
Lisa