

Learn how to make an easy origami greeting card by following these simple steps. As a teacher who enjoys introducing students to the art of easy origami, I’m happy to be able to share this fun project with you. Think origami paper folding is difficult? Not when you follow the directions here. You’ll have an origami greeting card in no time!
Feeling the Need to Create?
Do you ever have one of those days when you just need to create something fun? I had one of those days just recently, and making this easy origami card really lifted my spirits. I’m not sure who will be the recipient, but I’m glad to have it in my stash of cards to send. If you are feeling the need to create, or if you need some inspiration, keep reading. How do you make a super easy origami greeting card? This origami card is simple to put together and fun to give. You can use it as an origami thank you card, a Mother’s Day card, or a DIY origami birthday card. It’s great for any occasion. I hope you’ll try making it and find it as relaxing as I did.

Benefits of Creating
As some of you know from reading my posts about planting garden containers or pointillism painting, I consider myself artistically challenged. Yet I often feel the urge to be creative and make something, even if it lacks polish. Some of the things I create turn out well, some not so well. That doesn’t stop me from getting inspired and needing an outlet for my ideas. That’s one of the things I love about being a teacher and being a blogger. I have a place to share my ideas and try new things. Creating something can be a great stress-reliever. If ends up looking lovely, all the better. Even if it doesn’t, I feel better after making it. So don’t be afraid to try this. I usually share ideas that give readers a high probability of experiencing success. This art activity will be fun and simple, I promise.
My Origami Backstory
Origami is the Japanese art of folding paper into decorative shapes. I first became acquainted with it years ago, when I was in college and I had the opportunity to travel to Japan. The people there were very welcoming, hospitable, and were always sharing simple gifts.

I stayed with a few host families, and it seemed to give them great pleasure to present me with beautiful tokens of friendship. I have many treasured keepsakes from my time there, and I still exchange holiday greeting cards with a lovely elderly couple. One of the most special mementos of my time there is a necklace made of origami paper cranes.

I have it carefully stored in a box, and I love to get it out to show students when I teach anything related to Japan. One year, I made a video for my students showing them how to make a paper crane, but it’s on a VHS tape, so I can’t share it with you now. Someday I hope to get around to converting it to a digital format. Origami has a special place in my heart. If this is your first experience with origami, these easy origami blooms are a great project to start with.
More Than Just an Easy Origami Card
Before getting to the origami part of the card, you will first have to decide how you are going to create the background. This project is not strictly an origami creation. It’s more of a mixed media opportunity. The origami flowers are added at the end as a finishing touch. Before you do some paper folding, let’s explore what some of your easy background options are.
Ideas for Backgrounds
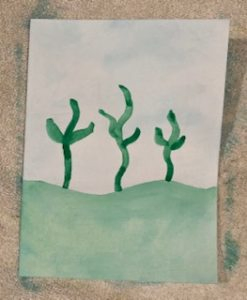
I like the idea of being able to get a background done quickly. For the photo shoot, I chose to use an old watercolor paint set my boys once used. I keep all of their old school supplies in my craft cupboard in our laundry room. I have crayons, markers, stickers, and old watercolor paint sets that don’t get used very often. They still get the job done. I just gave the front of the blank white cardstock greeting card a wash of blue paint and blotted it with a paper towel.

Then I swept some green paint across the bottom of the white card.

Finally, I painted some green stems and leaves, then let the paint dry.
Other ideas for getting a background done for your origami card include using a broken blue crayon on its side and lightly shading in the sky. Then using a broken green crayon for the grass. After that, you could draw on some stems and leaves. If you have some extra time, you could try using the easy pointillism technique I described in this post. The results would be stunning! Note: If you paint your background with watercolors, the card might curl up slightly as it dries. To avoid this, just put the damp side down on an old towel and put a heavy book or something on top of the card to keep it flat as it dries.
Materials
No matter which method you use for creating a background to display your origami blooms upon, here are the supplies that are essential for this project. This is assuming that you have things like crayons or watercolor paints around. If you don’t you can pick those up anywhere. Here are the specialty supplies you will need. What kind of paper is used for greeting cards? Your best choice is a blank white cardstock greeting card. I like to buy mine in bulk so that I’ll always have some on hand. I like to make pressed flower greeting cards as well as origami flower cards. This pack of 100 is perfect, and it will last a long time. Envelopes are included.

![]()
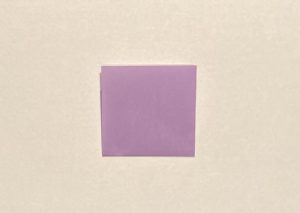
Next, you will need some origami paper. For this project, I used some plain pastel colors, but you can find origami paper in many patterns as well. Here’s a nice set of 200 sheets at a bargain price, and it’s the 6-inch size, which is what I used for this project.

![]()
Most origami paper has a colored side and a white side. If the paper you buy is colored on both sides, that’s okay. If you have an undeniable urge to do some origami paper folding and have no origami paper, you can use wrapping paper, but it has to be cut in a perfect square. That can be trickier than you might think. The final item you will need for this project is a glue stick. Any kind of glue stick will work. Now you’re all set! (No origami paper on hand? No problem! Try one of these substitutes instead.)
Directions for the Origami Blossoms
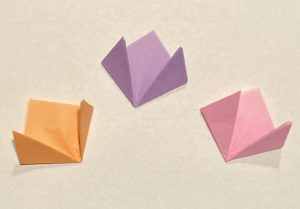
Choose three pieces of origami paper from your pack.

Fold the origami paper in half, white side in, to form a long rectangle.

After each fold, make a firm crease with your fingernail. Try to match the corners exactly if you can. Fold the origami paper in half again to form a small square and crease.
Rotate the square so that the opening with four visible layers is farthest away from you. Fold the bottom corner (closest to you) up so that you now have a triangle. Place the bottom long end of the triangle closest to you.

Carefully start to fold the triangle in half, but stop when you have found the center point and make a little crease with your thumbnail. You are not going to make a fold, you just need to make a little mark.

Take one corner of the triangle and bring it up so that it crosses the side of the triangle about 3/4 of the way to the top point and make a fold. Do the same with the other side. Crease each fold.

Now you have finished one origami blossom. Fold two more just like the first. If you have smaller origami paper, you might be able to fit more than three on your greeting card. Three was the maximum for the 5-by-7 sized card I made.
Last, glue your origami blooms onto the card. I like to put the glue from the glue stick near the bottom point of the origami flower, press, and hold for a few seconds.

If you think your blossoms are popping out too much, you can re-employ the heavy book used earlier to flatten out the card on a hard surface.
Here are some other DIY projects you might enjoy:
- Making an Easy DIY Pole Bean Tower
- DIY Garden Stepping Stones
- Fun and Easy Father’s Day Gift For Young Kids to Make
- DIY Pressed Flower Greeting Cards
Are You Already Thinking of Someone Who Might Enjoy Receiving an Origami Greeting Card?
I’m thinking of someone right now. The nice thing is, I have enough supplies, and perhaps you do too, to make many more. If this was your first time creating anything with origami paper, I hope you’ll be inspired to go ahead and try some other designs.
Planning for Creative Inspiration
It’s always nice to have a place to jot down ideas and schedules for projects. With this 16-page planner, all of your craft projects, appointments and lists can be in one well-organized place. Just download and print the file to get started.
Get the planner!
Have a wonderful week, and may all of your greeting card endeavors turn out well!

Lisa Mitchell is a wife, mom, and teacher who gets inspiration for craft projects from the beautiful outdoors surrounding her family’s small Pacific Northwest farm. To learn more about what this website has to offer, click on over to the About page.
Want more great garden, food, or travel ideas? Follow FluxingWell on Pinterest, Facebook, Instagram, and X for the latest posts, tips, and inspiration.
We must have different interpretations of easy but there is no way I can do this but I might give it a try. Love the photo of your big hair.
Haha! Yes, the hair was quite something. If you try this, let me know and I’ll feature it in an Instagram story!=)
I love it! This is definitely something even my art project adverse 10 year old will love to do. It’s so great how you include step by step pictures, I think it will make it a breeze to implement.
Also, what fun for your yo spend some time living abroad in Japan! I’m dreaming of visiting there and eat all the sushi and drink all the matcha I can 🙂
Sushi and tea, fun! I’d love to return to Japan, and I hope you do get to visit. I can totally relate to your art project adverse 10 year old. If you end up giving this project a try, I’d love to see a picture!
This is super cute and a low maintenance craft! The only reason I shy away from making my own cards is that I never think they look cute enough, but this is simple and cute! Will definitely give this a try!
I have the same problem. My crafts usually turn out kind of rustic looking. This one was easy!
Adorable craft project! There’s something special about a homemade card that makes everyone smile. Thank you for sharing the idea.
BTW, I love the origami necklace– very unique keepsake. Your students must love it!
Oh, yes, that origami necklace is very special to me. Fun memories! I’m so glad you like the card idea.
Creativity is my favorite outlet 🙂 This origami is just adorable. Thanks so much for sharing!
Oh, thank you for the kind words. I had fun making it!
Thanks for this post, Lisa! I have never visited Japan but have heard of origami. I love the photos of your trip and this beautiful necklace! Also, the instructions on how to make an easy origami card are simple and fun! Thanks so much for sharing!
You are very welcome! I have many fond memories of my trip, and it was fun to include a photo. What a blast from the past!=)
These are super cute! It’s always so lovely to receive something handmade like this too. So neat to read about your adventures in Japan, how cool to have had that experience!
Yes, I am so grateful. I’m glad you liked the post. My visit to Japan has had long-lasting benefits for sure!