
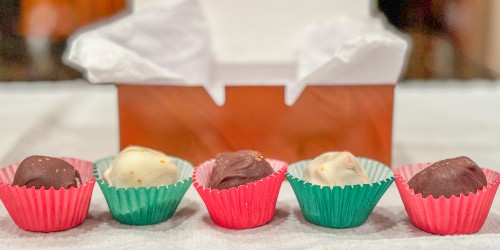
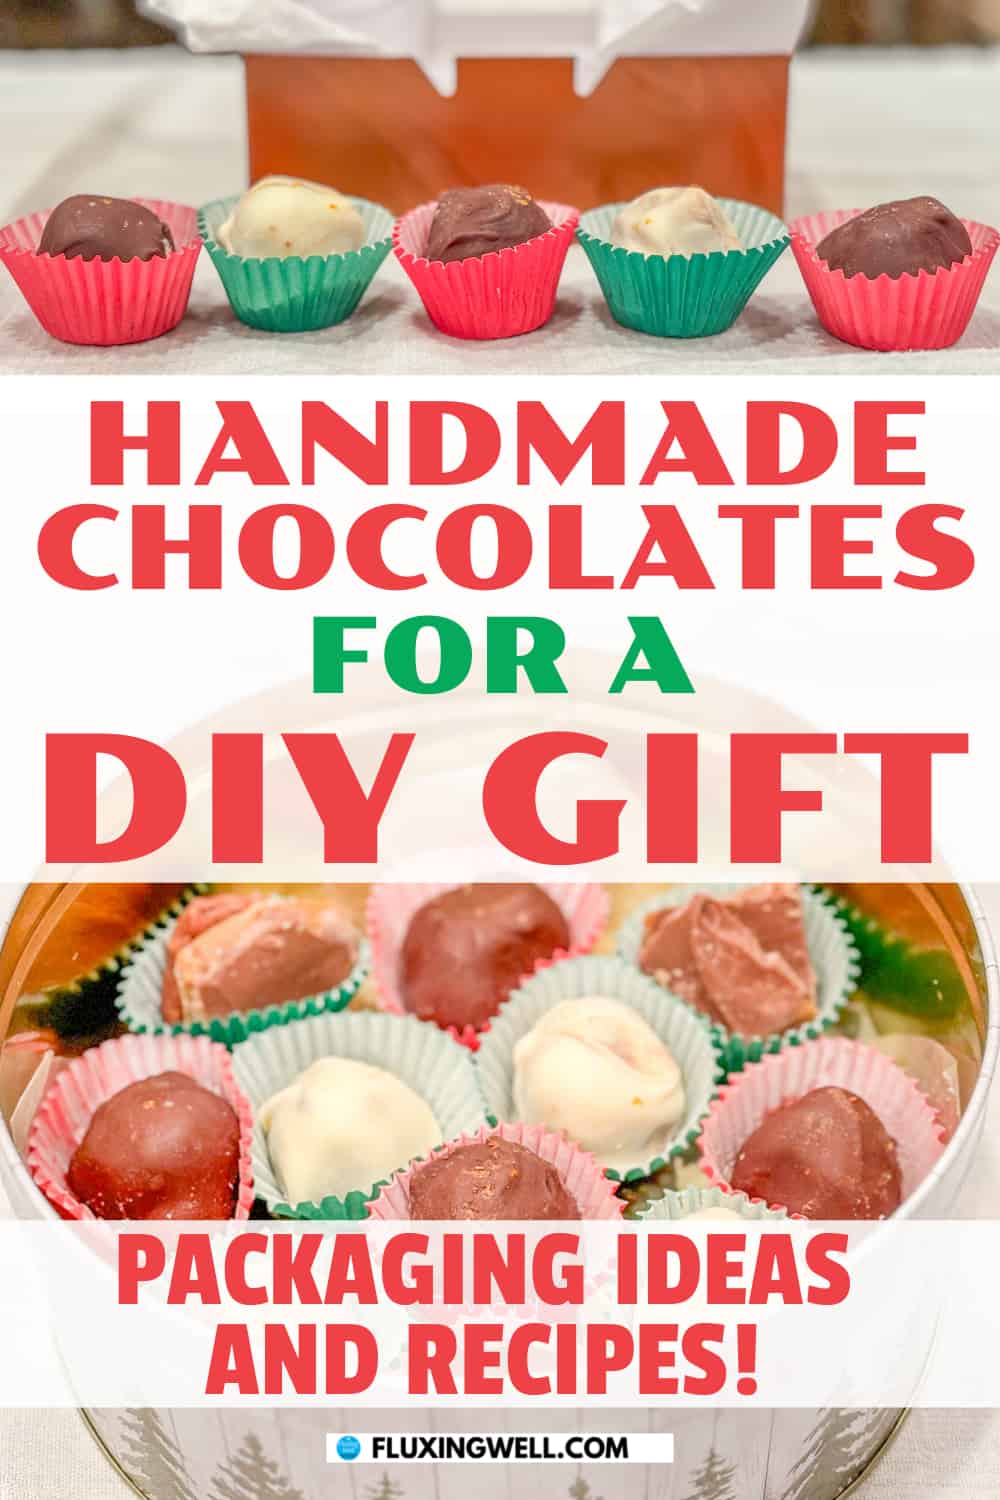
Create a box of handmade chocolates for a homemade chocolate gift box to give away to someone special. A box of handmade chocolates is a welcome gift any time of the year, whether for Christmas, Valentine’s Day, or any other special occasion. Learn how to make a chocolate gift set the easy way with these simple ideas for making different types of handmade chocolates. Get ideas for packaging homemade chocolate candy as well. Make a chocolate gift for a girlfriend, boyfriend, spouse, friend, or anyone special. Ready for some delicious handmade chocolate ideas? Let’s get started!
My Handmade Chocolates Backstory
My love for making handmade chocolates happened when I was a young mom. A friend from my high school days would come over to visit and we would experiment with fun recipes during my boys’ naptime. One of the experiments was a truffle recipe we had discovered. Most of the ingredients were easy to find, and the result was delicious. We made enough to give away and still had some left over for ourselves.
Fast forward a few years to one Christmas season when I was making handmade chocolate treats for the holidays. I tried making as many recipes as I could find and did a lot of experimenting to determine which ones would make the cut in future years. It was a wonderful time of chocolate overload, and out of it came the idea to have each person in the family just choose one favorite type of homemade candy to request. The requests change every year, as there are a lot of handmade chocolate options to choose from. Today I’m sharing our family favorite handmade chocolate recipes and ideas with you so you can make your own homemade chocolate gifts. Have fun perusing the choices!
Handmade Chocolate Truffles
Decadent and creamy, handmade chocolate truffles may be made in many flavors. Here are a few of my favorites. This little gadget that makes the truffle-shaping process a lot easier. The basic recipe for the ganache filling may be adapted to create new and exciting flavor combinations.
Dark Chocolate Raspberry Truffles
Decadent and rich, this dark chocolate raspberry truffles recipe would make a great gift idea or a sweetly satisfying addition to a tea party dessert tray. Add these delectable morsels to your box of handmade chocolates.
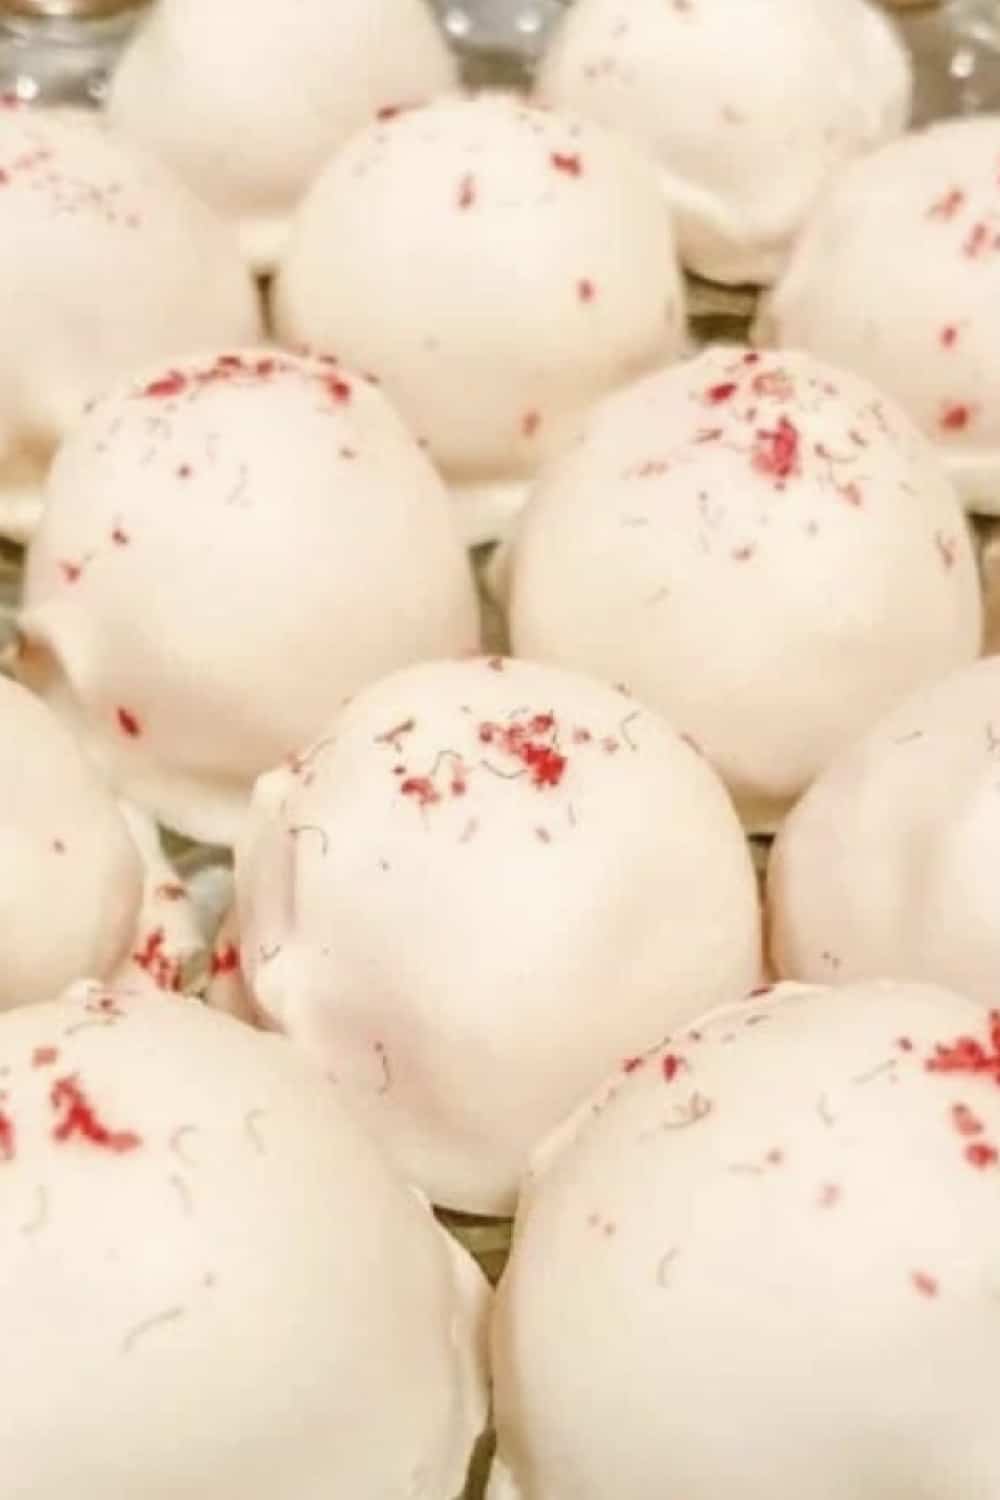
White Chocolate Raspberry Truffles
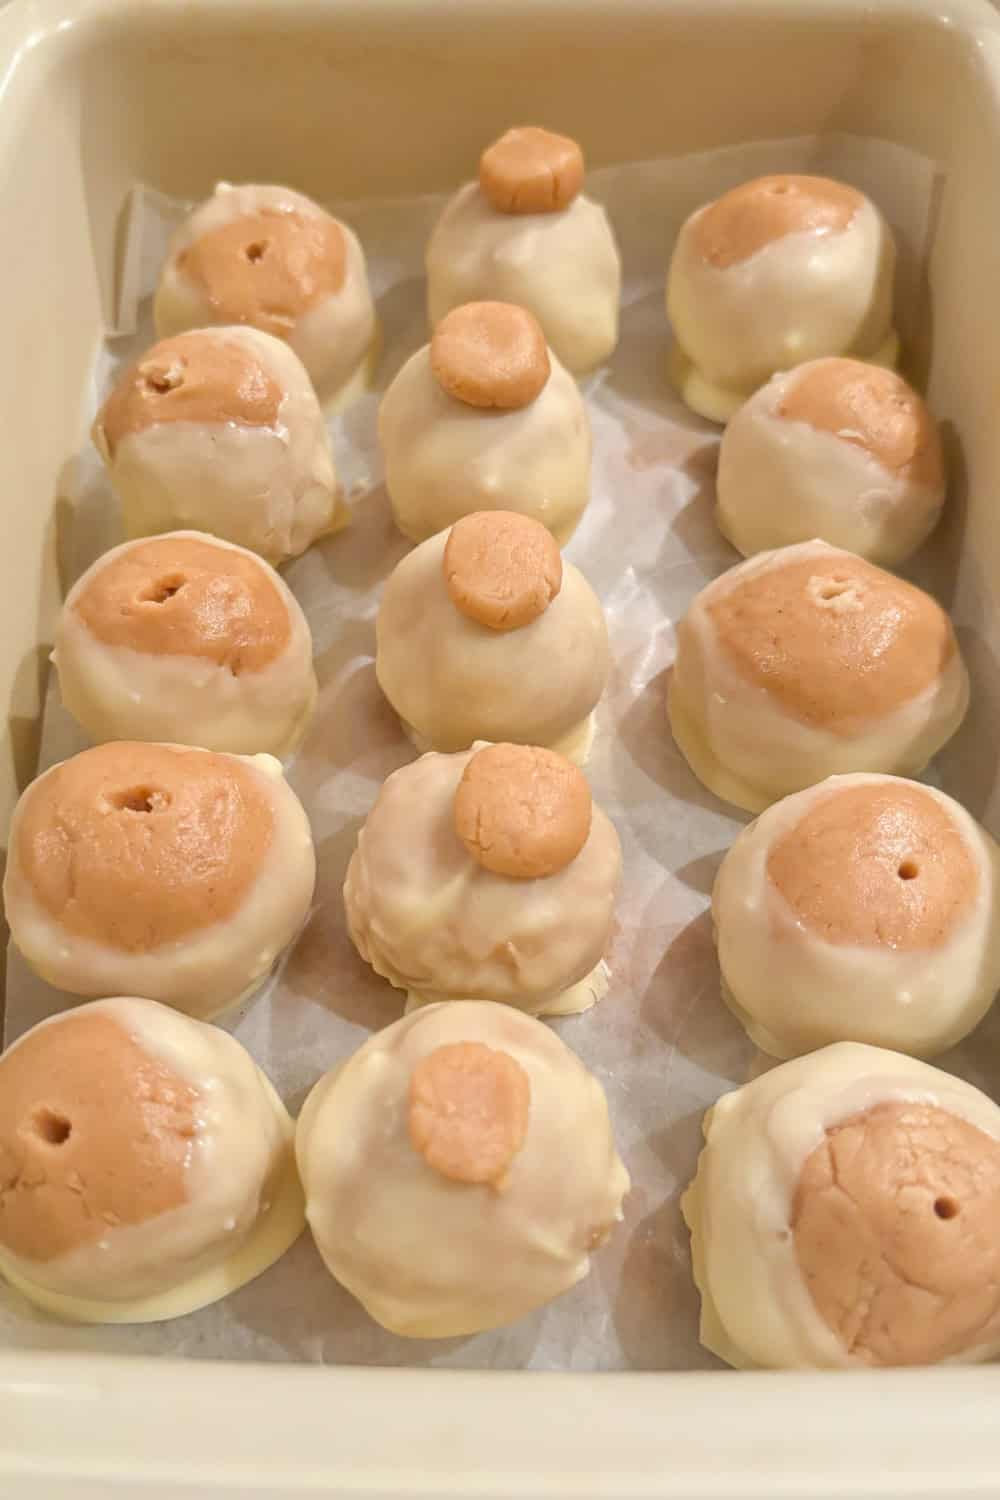
This white chocolate raspberry truffles recipe makes a decadent treat any time of the year, but it’s especially fun to make these around Christmas or Valentine’s Day. Also known as white chocolate raspberry balls, you can box up a few with other kinds of handmade chocolate truffles or make a gift box with just this single, popular homemade truffle flavor.
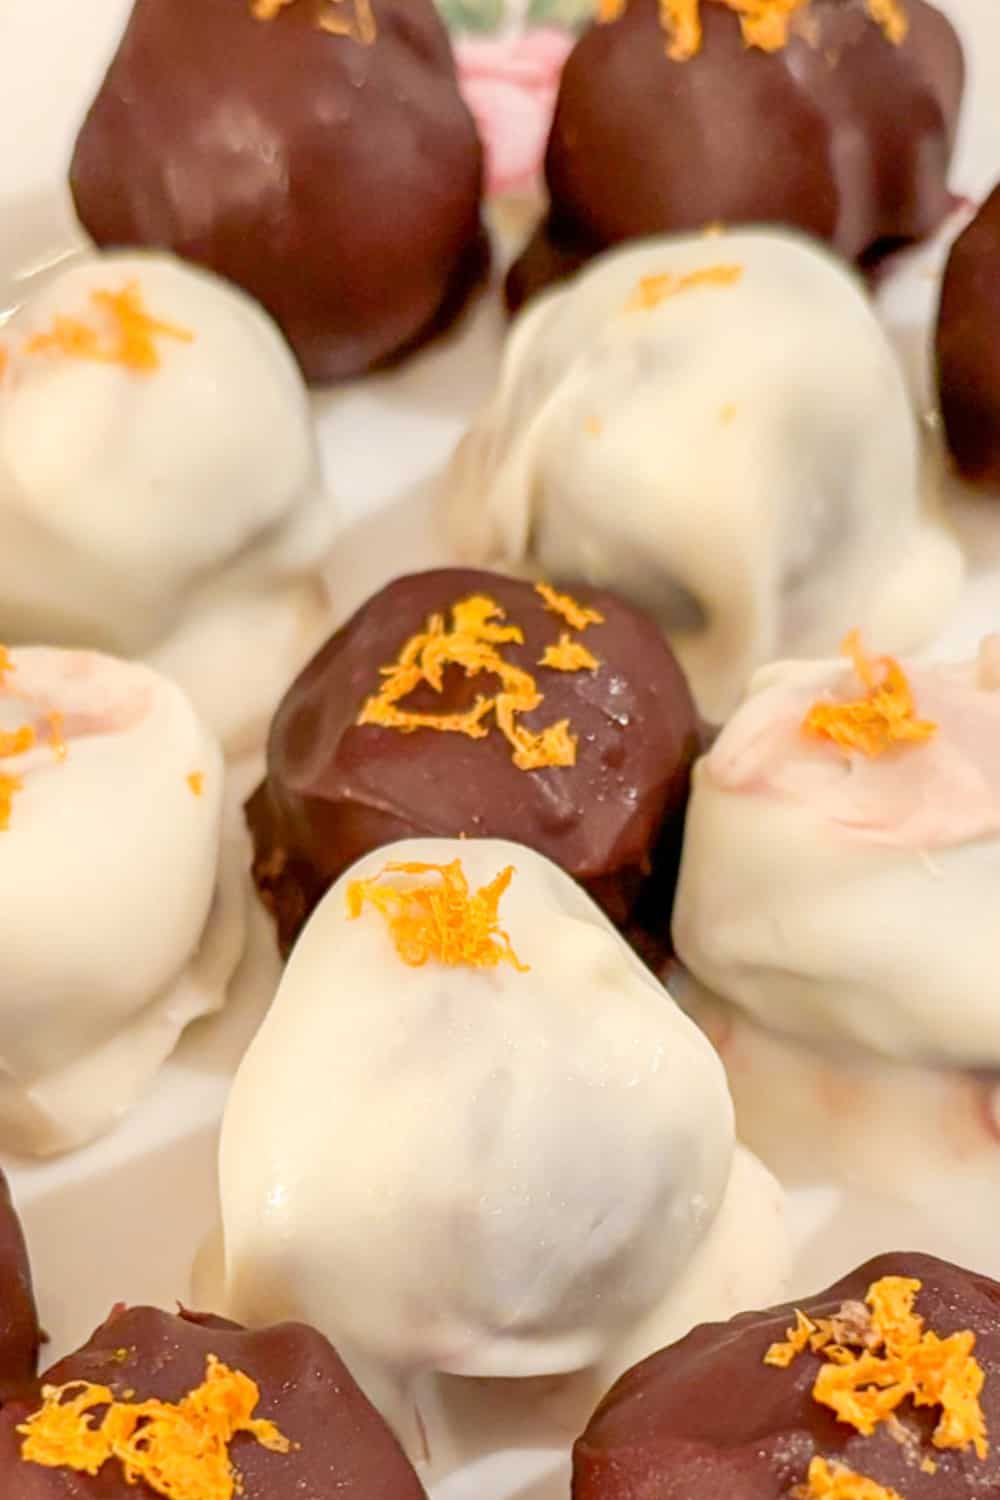
Chocolate Orange Truffles
Learn how to make chocolate orange truffles the easy way with simple ingredients and step-by-step instructions. This chocolate orange truffles recipe may be made with dark chocolate, milk chocolate, or white chocolate.
Chocolate Key Lime Truffles
To make chocolate key lime truffles, follow the same recipe as the chocolate orange truffles. Just substitute 2 tablespoons of key lime marmalade instead of orange marmalade and add 1/4 teaspoon of key lime extract (more or less to taste). If you have a fresh lime, zest it and sprinkle the lime zest on top of the outer chocolate coating before it dries.
Chocolate Peppermint Truffles
Rather than using semi-sweet, milk chocolate, or white chocolate chips for the chocolate ganache truffle filling called for in the previous chocolate truffles recipes, substitute mint chocolate chips, then mix with the cream and butter. Chill and shape the truffles as directed in the recipe. Finely crush one peppermint candy cane and sprinkle the peppermint dust on top of the chocolate-coated truffles before the outer chocolate coating dries.
White Chocolate Peanut Butter Truffles
If you are a fan of classic chocolate peanut butter buckeyes, you may appreciate this white chocolate peanut butter version. To make white chocolate peanut butter truffles, just follow the alternate dipping method for adding the white chocolate coating. White chocolate plus peanut butter equals a winning combination!
Other Truffle Varieties
Since we grow a lot of berries on our small farm, it’s easy to substitute blackberry or blueberry jam for the jam called for in the white and dark chocolate raspberry truffles. You can use your imagination and favorite flavors to guide you as you experiment with what you have on hand. Here are even more flavors!
Handmade Chocolate Covered Treats Recipes
Your handmade chocolates for a DIY chocolate gift box do not have to be all truffles. Some people would rather have a variety of different kinds of chocolates to choose from. Here are a few of the non-truffle chocolate candy ideas.
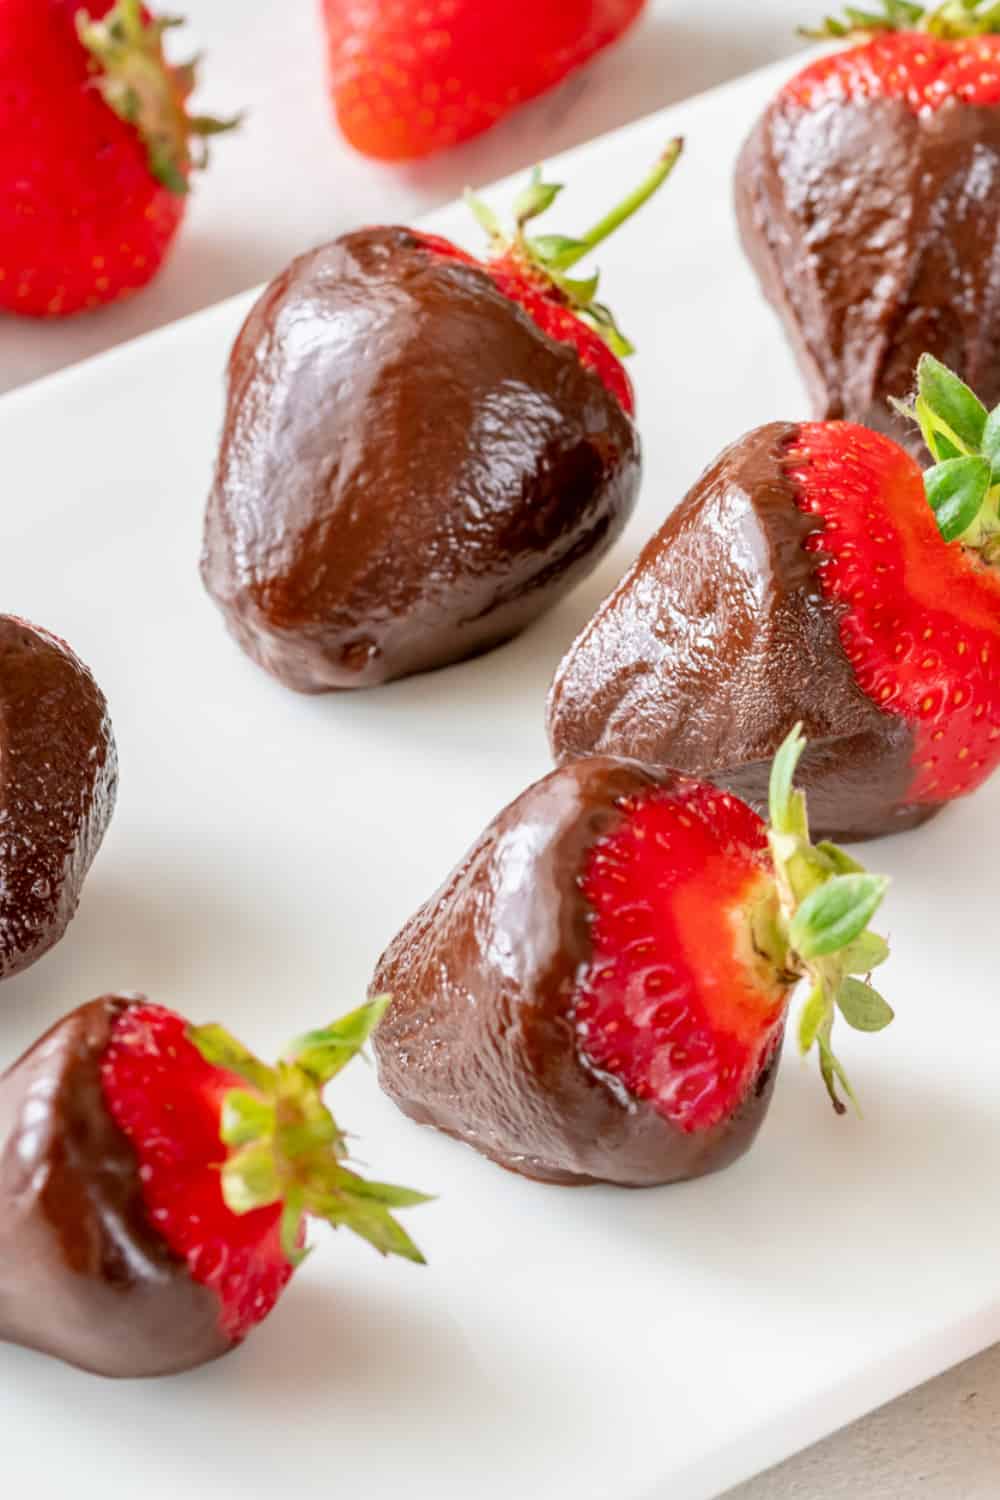
Chocolate Covered Strawberries Recipe
Here’s a simple recipe for chocolate-dipped strawberries:
Ingredients:
1 pound of fresh strawberries, washed and dried
Parchment paper
1 cup semi-sweet or dark chocolate chips or chopped chocolate pieces
1 tablespoon unsalted butter (optional, for added smoothness)
Toppings like chopped nuts, coconut flakes, or sprinkles (optional)
Instructions:
Prepare Strawberries: Ensure the strawberries are thoroughly washed and dried. Line a baking sheet with parchment paper.
Melt Chocolate:** In a heatproof bowl, melt the chocolate. You can do this using a double boiler or in short intervals in the microwave, stirring each time. If desired, add a tablespoon of unsalted butter to enhance smoothness. I like to use a small pyrex mixing bowl on top of a small saucepan of hot (not boiling) water on the stovetop when I am dipping chocolates.
Dip Strawberries: Holding a strawberry by the stem, dip it into the melted chocolate, swirling to coat evenly. Allow any excess chocolate to drip back into the bowl.
Place on Parchment: Place the dipped strawberries on the parchment-lined baking sheet. If using toppings, sprinkle them on the chocolate before it sets.
Chill: Place the dipped strawberries in the refrigerator for at least 30 minutes to allow the chocolate to set.
Serve: Once the chocolate is set, your chocolate-dipped strawberries are ready to be served. Arrange them nicely on a plate or in a box for a sweet and romantic treat. Use mini paper baking cups for added protection.
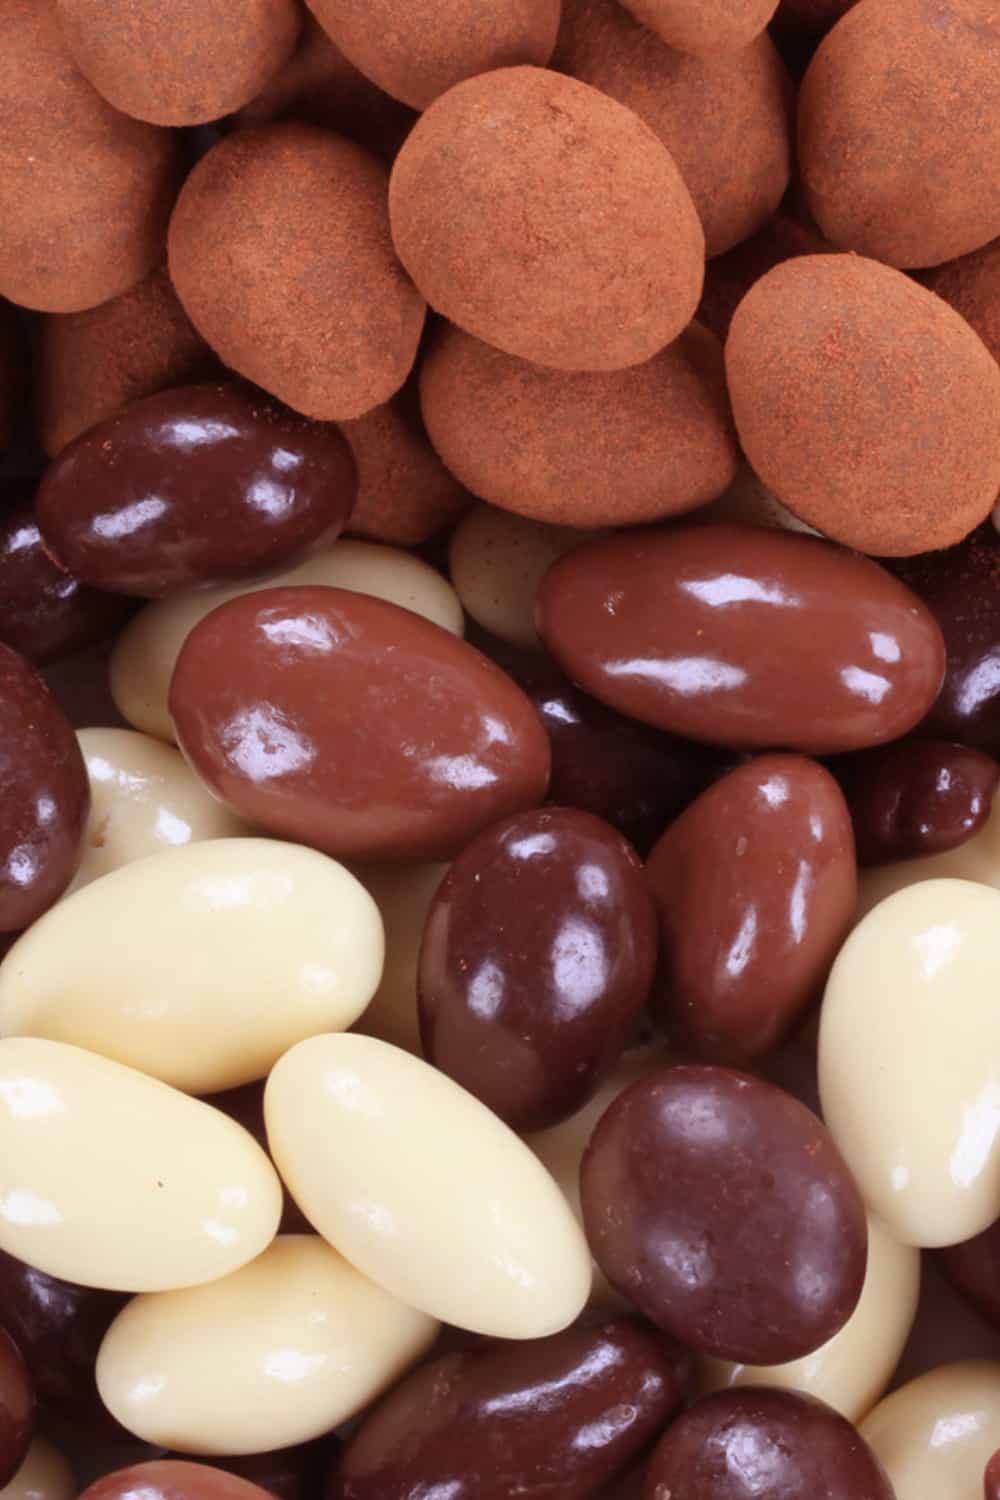
Chocolate Covered Almonds
Here’s a simple recipe for chocolate-covered almonds:
Ingredients:
1 cup whole almonds
1 cup dark, milk, or white chocolate chips or chopped chocolate pieces
1 tablespoon unsalted butter (optional, for added smoothness)
Sea salt for sprinkling (optional) or cocoa powder for coating (optional)
Instructions:
Prep the Baking Sheet: Line a baking sheet with parchment paper.
Prep Almonds: Spread the almonds on a baking sheet in a single layer.
Melt Chocolate: In a heatproof bowl, melt the chocolate. See the recipe above for the preferred way I like to melt chocolate for dipping or coating.
Coat Almonds: Once the chocolate is melted, add the almonds to the bowl, stirring to coat them evenly.
Remove Almonds: Using a fork or slotted spoon, lift the chocolate-coated almonds from the bowl, allowing excess chocolate to drip off.
Place on Parchment: Place the coated almonds on a parchment-lined baking sheet, ensuring they are separated to avoid clumping.
Chill: Place the baking sheet in the refrigerator for about 30 minutes or until the chocolate coating is set.
Sprinkle Sea Salt (Optional): If desired, sprinkle a bit of sea salt over the chocolate-covered almonds or coat the chocolate covered almonds with cocoa powder while they are still slightly tacky.
Serve or Package: Once the chocolate is fully set, your chocolate-covered almonds are ready to be enjoyed. Package them in a jar, gift bag, or mini baking cups in a chocolate gift box for a delightful treat.
Chocolate Covered Peanut Butter Pretzels
Substitute 1 cup of peanut butter pretzels for the 1 cup of almonds in the recipe above. Follow the same instructions for dipping and setting the coating. Sprinkle with sea salt if desired while the chocolate coating is still a bit tacky. Package in a gift bag, Mason jar, or small paper mini baking cups as part of a homemade chocolate gift box.
Chocolate Covered Espresso Beans
Making chocolate-covered espresso beans is a delightful process. Here’s a simple recipe for the best chocolate covered espresso beans and coffee beans:
Ingredients:
Parchment paper
1 cup whole espresso beans or coffee beans (freshly brewed and dried)
1 cup dark chocolate chips or chopped chocolate
1 tablespoon unsalted butter (optional, for added smoothness)
Instructions:
Brew and Dry Espresso Beans: Brew a strong cup of espresso and let the beans cool and dry completely. Pat them dry with a paper towel if needed.
Melt Chocolate: In a heatproof bowl, melt the dark chocolate. Use a bowl on top of a saucepan method (detailed above) or melt it in the microwave, stirring at intervals. If you prefer, add a tablespoon of unsalted butter to the melted chocolate for added smoothness.
Coat Espresso Beans: Stir the espresso beans into the melted chocolate, ensuring they are well coated.
Remove Beans: Using a fork or slotted spoon, lift the chocolate-covered espresso beans from the bowl, allowing excess chocolate to drip off.
Place on Parchment:** Place the coated espresso beans on a parchment-lined baking sheet, ensuring they are separated for individual pieces.
Chill: Put the baking sheet in the refrigerator for about 30 minutes or until the chocolate coating is fully set.
Break Apart (Optional): If the beans have clumped together during the cooling process, gently break them apart.
Serve or Package: Once the chocolate is completely set, your chocolate-covered espresso beans are ready to be enjoyed. Package them in a jar or airtight container for freshness. Alternatively, you could put a few in some mini baking cups and package them in a box as part of a DIY homemade assorted box of chocolates. These make a fantastic treat or gift for coffee lovers.
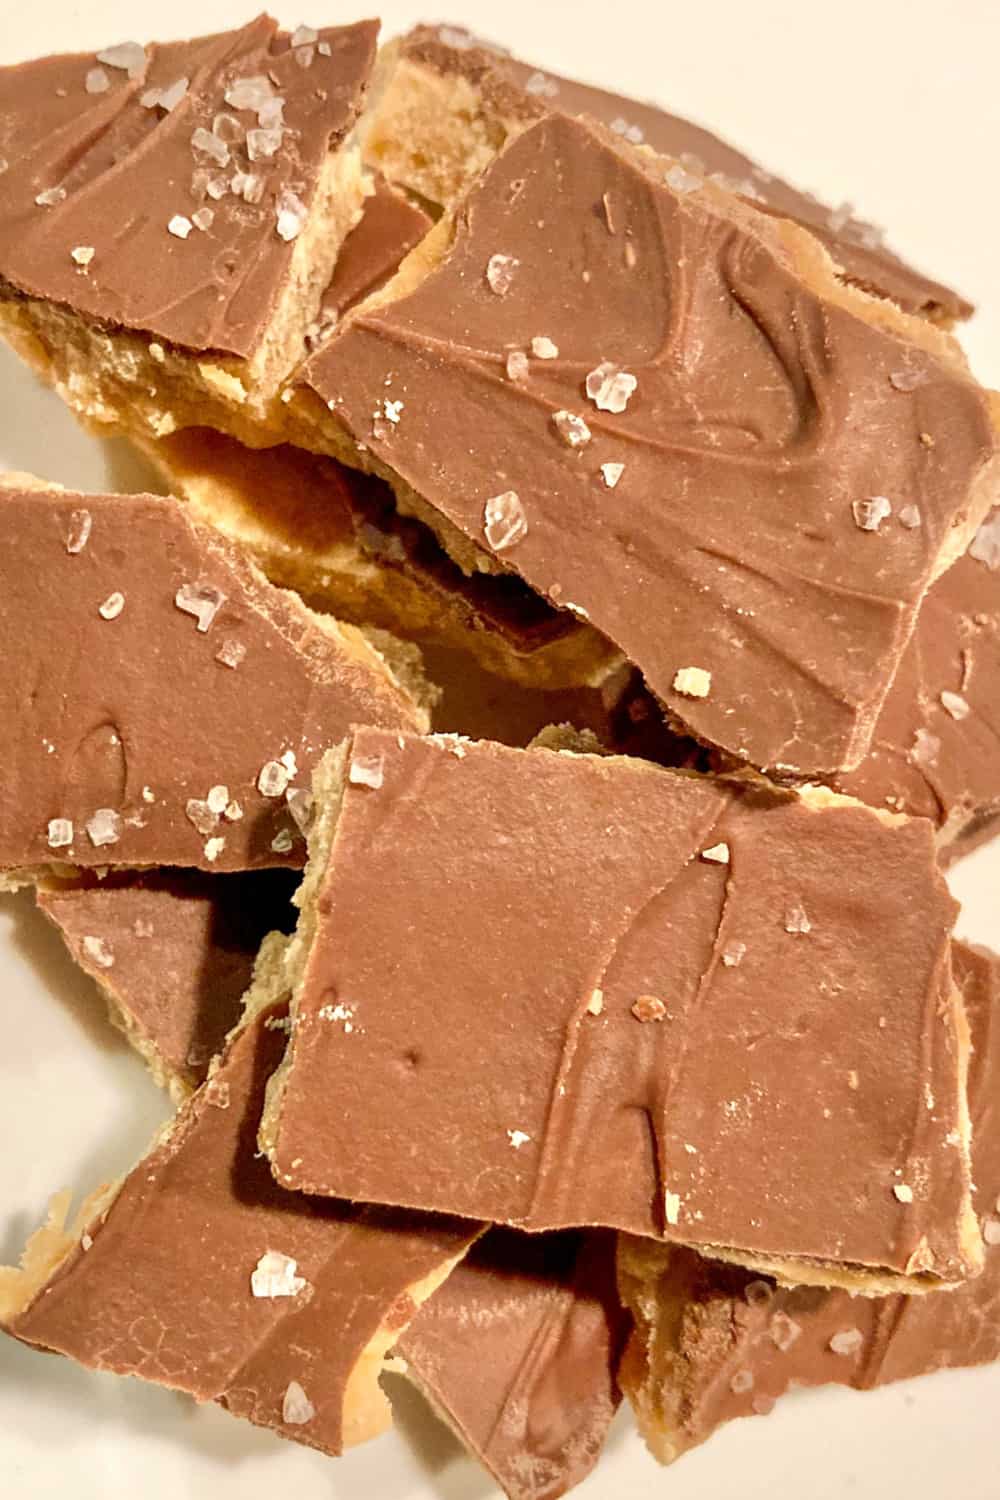
Chocolate Turtles
Chocolate turtles make a delightful treat with the combination of caramel, pecans, and chocolate. Here’s a simple recipe for chocolate turtles:
Ingredients:
1 cup pecan halves
1/4 cup caramel candies, unwrapped
1 cup milk or dark chocolate chips or chopped chocolate
Sea salt for sprinkling (optional)
Instructions:
Prepare Pecans: Preheat your oven to 350°F (175°C). Arrange pecan halves in small clusters on a parchment-lined baking sheet.
Add Caramel: Place one caramel candy on top of each cluster of pecans.
Bake: Bake in the preheated oven for 5-7 minutes or until the caramels are softened. Remove from the oven.
Press Down: While the caramels are still warm, use the back of a spoon to gently press down on each cluster, flattening the caramel slightly and creating a turtle shape.
Melt Chocolate: In a heatproof bowl, melt the chocolate. You can use a double-boiler, the bowl over a saucepan stovetop method, or melt it in the microwave, stirring at intervals.
Coat Turtles: Spoon melted chocolate over each caramel-pecan cluster, ensuring they are completely covered.
Chill: Place the baking sheet in the refrigerator for about 30 minutes or until the chocolate coating is fully set.
Sprinkle with Sea Salt (Optional): If desired, sprinkle a bit of sea salt over the chocolate turtles while they are still tacky.
Serve or Package: Once the chocolate is set, your chocolate turtles are ready to be enjoyed. Package them in an airtight container, gift bag for sharing, or in mini paper baking cups as part of a homemade chocolate gift box
White Chocolate Turtles
To make white chocolate turtles, just substitute white chocolate chips (or chopped chocolate) for the milk or semi-sweet chips in the recipe above. Follow all of the steps as written for delicious white chocolate caramel turtles.
Other Handmade Chocolates for a Chocolate Gift Box
Chocolate Cake Pops
Homemade Chocolate Toffee (with or without Almonds)
Chocolate Scotcheroos
Chocolate Peanut Butter Fudge
Use a basic recipe for peanut butter fudge and modify it to include chocolate. Substitute 3/4 cup of milk chocolate chips for 3/4 cup of peanut butter called for in the peanut butter fudge recipe. Keep the rest of the ingredients and steps as written and enjoy a chocolate peanut butter treat.
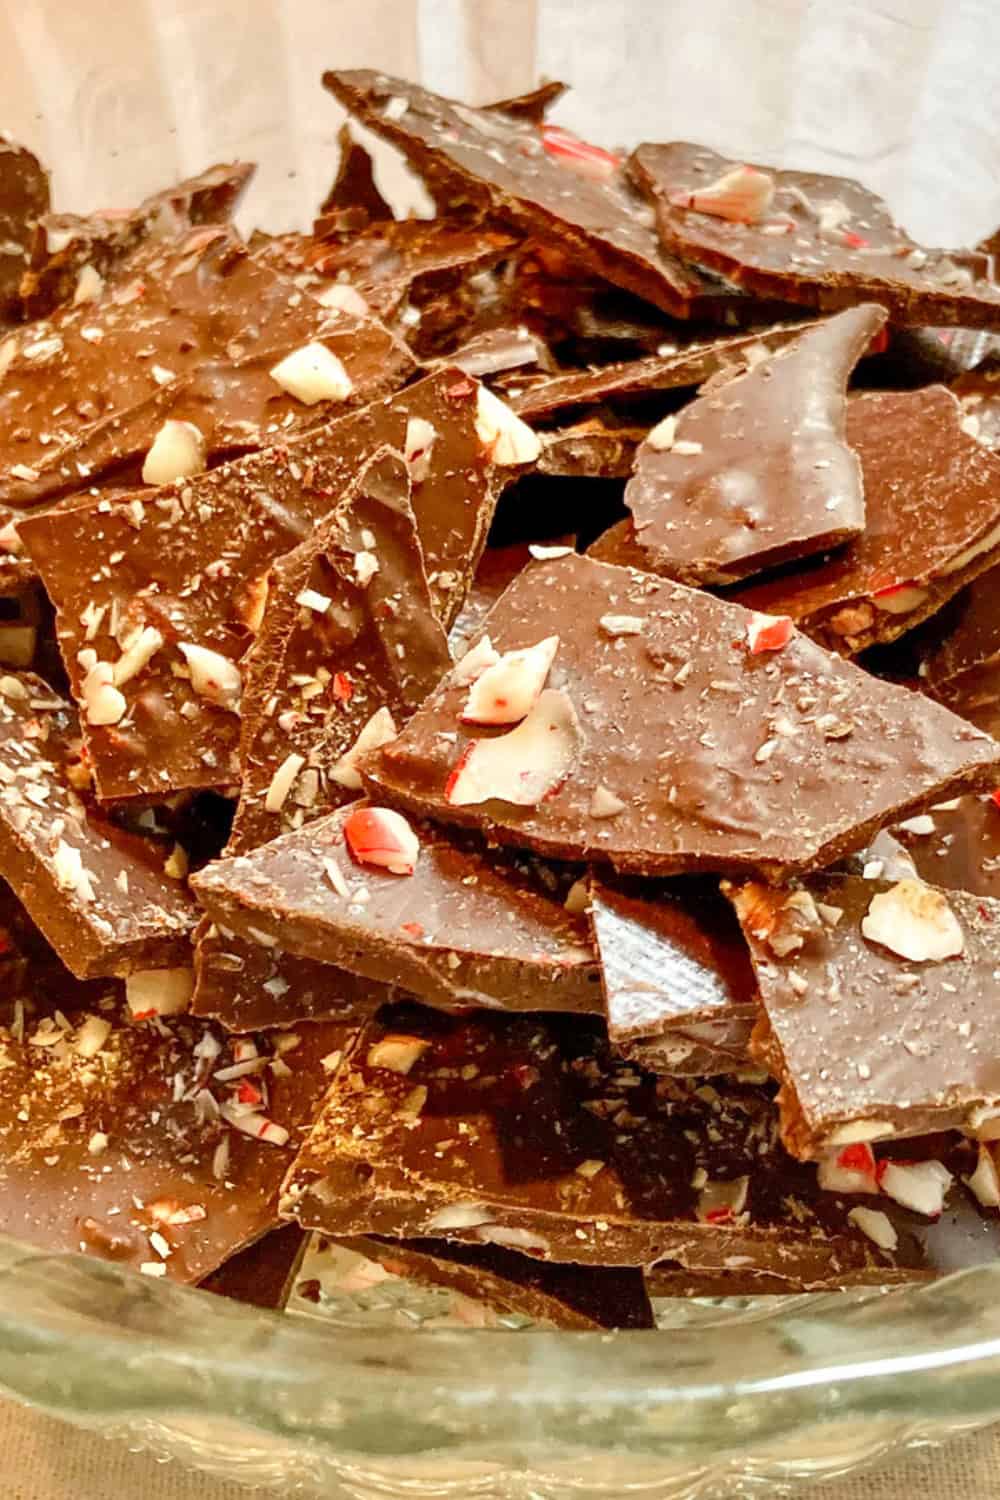
Dark Chocolate Peppermint Bark
Common Handmade Chocolates Questions
What is the best chocolate to use for homemade chocolates?
High-quality chocolate with a cocoa content of around 60-70% is ideal for homemade chocolates. Brands like Valrhona, Callebaut, or Ghirardelli are popular choices. Choose between milk, dark, or white chocolate based on your preference and the type of chocolates you’re making. Experimenting with different brands and cocoa percentages can help you find the perfect balance of flavor and texture for your homemade treats.
What is the best oil for chocolate making?
When making chocolate, cocoa butter is the preferred fat. It is integral to chocolate’s texture and flavor. However, if you need to thin or adjust the consistency, use vegetable oil like canola or sunflower oil. Be cautious with the amount, as adding too much can affect the chocolate’s taste and texture.
For chocolate dipping, use oils with a neutral flavor to avoid altering the taste of the chocolate. Grapeseed oil, canola oil, or vegetable oil are good choices. Start with a small amount and gradually add more if needed to achieve the desired consistency for smooth dipping.
For a shiny appearance with chocolate-dipped fruit, coconut oil is a popular choice for dipping chocolate. It can enhance the smoothness and fluidity of the melted chocolate, making it easier to work with. Additionally, coconut oil adds a subtle coconut flavor, so consider this if it complements the taste of your dipped fruit treats. Use it in moderation, as adding too much can affect the chocolate’s texture and flavor.
Why do people add coconut oil to melted chocolate?
People add coconut oil to melted chocolate for a few reasons:
Texture: Coconut oil helps create a smoother and more fluid consistency in melted chocolate, making it easier to work with, especially for coating or dipping.
Thinning: It can be used to thin out chocolate if it becomes too thick, making it easier to achieve a desirable coating on various treats.
Tempering: Coconut oil can aid in the tempering process, promoting a shiny finish and preventing the chocolate from developing a dull appearance or a gritty texture.
Flavor: The subtle coconut flavor of the oil can complement certain chocolate recipes, as noted previously, adding a pleasant taste to the final product. Moderation is the key.
What can I add to chocolate to make it harden?
To make chocolate harden, you can temper it, which involves a controlled melting and cooling process. Alternatively, you can add a small amount of cocoa butter or coconut oil to the melted chocolate. These fats help with the tempering process and contribute to a smoother, firmer texture when the chocolate sets. Just be cautious not to add too much, as it can affect the taste and texture of the chocolate.
What does it mean to temper chocolate?
Tempering chocolate is a process of heating and cooling chocolate to specific temperatures in order to stabilize its crystal structure. This ensures the chocolate remains smooth, glossy, and has a satisfying snap when it sets. The tempering process involves three main steps:
Melting: The chocolate is initially melted at a high temperature to break down all the existing cocoa butter crystals.
Cooling: The chocolate is then cooled to a specific lower temperature, allowing certain stable cocoa butter crystals to form.
Warming: The chocolate is gently reheated to a working temperature, which retains the desired cocoa butter crystals while eliminating any undesirable ones.
Properly tempered chocolate has a glossy appearance, a smooth texture, and contracts as it cools, making it suitable for coating candies, creating decorations, or forming molded chocolates.
Why isn’t my homemade chocolate hardening?
If your homemade chocolate isn’t hardening, it might be due to issues with the tempering process. Tempering is crucial for achieving the right texture and preventing a soft, dull finish. Here are some common reasons why homemade chocolate may not be hardening:
Incorrect Temperatures: The chocolate might not have been brought to the correct temperatures during the tempering process. Follow the recommended temperature ranges for melting, cooling, and reheating the chocolate.
Humidity: High humidity can interfere with the tempering process, causing chocolate to remain soft. Work in a dry environment and avoid exposing the chocolate to moisture.
Contaminated Utensils: Even a small amount of water or residual moisture on utensils can cause chocolate to seize or not set properly. Ensure that all equipment is completely dry.
Old Chocolate: Chocolate has a limited shelf life. Using old or improperly stored chocolate can lead to tempering issues. Always use fresh, high-quality chocolate.
Incomplete Melting: Ensure that all chocolate is completely melted before starting the tempering process. Incomplete melting can result in uneven tempering.
If you encounter issues, you might need to re-temper the chocolate by adjusting the temperatures correctly. Experimenting with small batches and practicing tempering techniques can improve your chocolate-making skills.
How long do homemade chocolates take to set?
The time it takes for homemade chocolates to set depends on various factors such as the recipe, the temperature of the environment, and the ingredients used. On average, it can take anywhere from 1 to 4 hours for chocolates to fully set at room temperature.
Factors influencing setting time include the type of chocolate (dark, milk, or white), the thickness of the chocolate layer, and whether tempering was done correctly. For faster setting, placing chocolates in the refrigerator can speed up the process, but be cautious about potential condensation affecting the texture.
Always refer to your specific chocolate recipe for guidance on setting times, and consider performing a test with a small batch to gauge the optimal setting time based on your conditions.
What is the favorite filling in a Valentine’s Day chocolate?
One popular and classic favorite filling for Valentine’s Day chocolates is a smooth and rich ganache, as with the chocolate truffles described previously. Ganache, made from a blend of chocolate and cream, comes in various flavors like dark chocolate, milk chocolate, or white chocolate. Other beloved fillings include caramel, fruit-flavored centers, nuts, or even liqueur-infused ganache. The choice often depends on personal preferences, and the variety in fillings adds a delightful surprise to each Valentine’s Day chocolate. If you aren’t sure of your Valentine sweetie’s preferences, give an assortment of chocolates.
Packaging and Storage Ideas for Handmade Chocolates: Questions and Tips
How do you package chocolate for a gift?
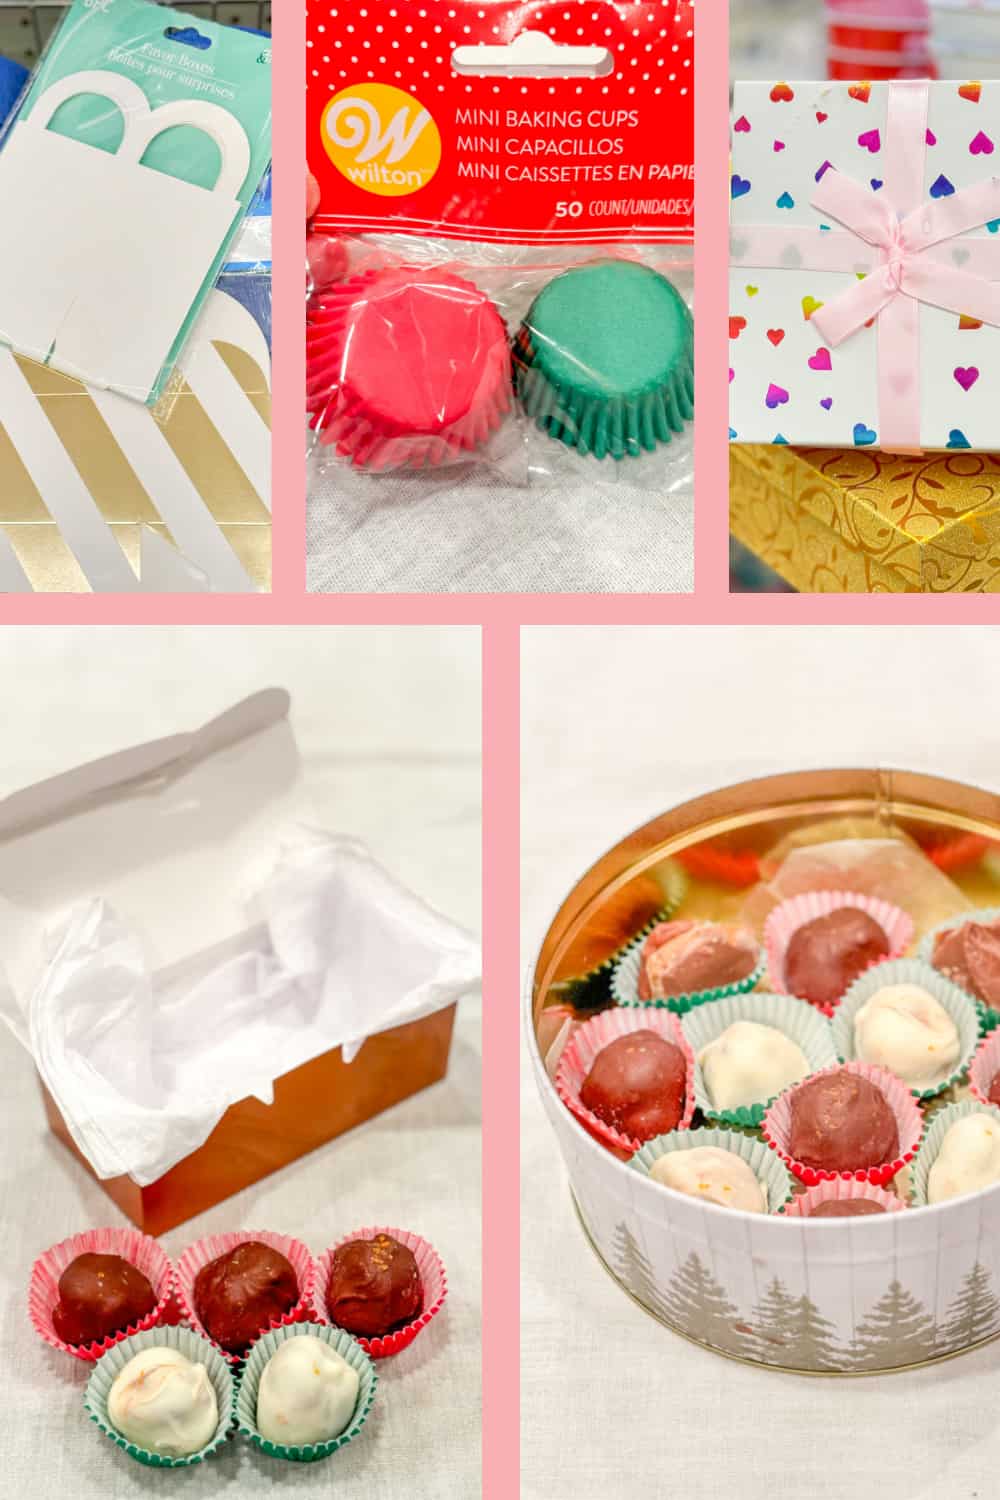
How do you package homemade chocolate candy? To package chocolate for a gift, consider placing them in an elegant box or tin lined with tissue paper, separating layers with parchment paper to avoid sticking. Source some inexpensive, festive gift boxes from the local dollar store, as shown in the collage above. You can also use decorative wrapping paper or ribbon to add a festive touch. Mini baking cups add a polished flair. If you are lucky, you might find some (pictured above) for 75% off at a post-holiday sale at the grocery store, like I did! Add a personalized touch with a handwritten note for a thoughtful presentation. Ensure the packaging is secure to prevent any damage during transit.
How long will homemade chocolates last?
Homemade chocolates typically last 2-4 weeks if stored properly. This is good news if you are making a handmade chocolate gift box with different varieties of chocolates. You won’t have to make the different batches all on the same day. You can space it out a bit, if you like.
Keep the homemade chocolates in a cool, dry place, away from direct sunlight and strong odors. Refrigeration can extend their shelf life, but it may affect the texture and appearance. If your chocolates contain perishable fillings, like cream or fruit, consume them sooner, as these ingredients have a shorter shelf life. Always check for any signs of spoilage, such as changes in color or an off smell.
How do you increase the shelf life of homemade chocolate?
To increase the shelf life of homemade chocolate, remember these tips:
Storage: Keep chocolates in a cool, dry place, away from direct sunlight and strong odors.
Packaging: Use airtight containers, or wrap each piece individually in foil or parchment paper to prevent moisture and odors from affecting the chocolate.
Refrigeration: If necessary, store chocolates in the refrigerator, especially if they contain perishable fillings. However, be cautious about potential condensation affecting the texture.
Avoid Temperature Fluctuations: Keep chocolates away from temperature fluctuations, as sudden changes can lead to condensation and affect the quality.
Quality Ingredients: Use high-quality ingredients, and ensure proper tempering during chocolate preparation for a stable final product.
Does homemade chocolate need to be refrigerated?
Homemade chocolate generally doesn’t need to be refrigerated if it doesn’t contain perishable fillings. It’s best stored in a cool, dry place, away from direct sunlight and strong odors, as already noted. Refrigeration can affect the texture and appearance of chocolate, leading to issues like condensation.
If your homemade chocolates have perishable fillings like cream or fruit, storing them in the refrigerator may be advisable to extend their shelf life. Always check the specific recipe or ingredients for guidance on storage.
More Food Inspiration
No time to make your own handmade chocolates for a chocolate gift? Fill up a box with some unusual chocolate gifts made by someone else or give a quick mug cake gift set. Are you now inspired to make your own handmade chocolates? Whether you are making a treat or making a meal, it’s always nice to have a plan. If you’re looking for a way to get more organized with your food planning efforts, I’ve got something for you. Free, editable meal planners! The templates can be used over and over, as often as you need them. You can make as many duplicates as you like, and you’ll be able to save old meal plans for future reference. I hope it simplifies things for you.

Get my digital, editable, printable templates!
I hope you enjoy making handmade chocolates. May all of your treat-making endeavors meet with great success!

Lisa Mitchell is a wife, mom, and school librarian who likes to create and share recipes, often using fresh ingredients from her family’s small Pacific Northwest farm. To learn more about what this website has to offer, click on over to the Food page.
Like this post? Please give it a share!
Want more great garden, food, or travel ideas? Follow FluxingWell on Pinterest, Facebook, Instagram, and X for the latest posts, tips, and inspiration.
Thank you for putting together this compilation of handmade chocolate recipes. Now I’m excited to put together some homemade chocolate gift boxes!
Great! I hope all of your handmade chocolate endeavors are a fabulous success!